Progress On My Sho-Bud Refurb.

Instruments, mechanical issues, copedents, techniques, etc.

Moderator: Dave Mudgett

User avatar
Douglas Schuch
Posts: 1504
Joined: 10 Jun 2011 9:33 am
Location: Valencia, Philippines
State/Province: -
Country: United States

Progress On My Sho-Bud Refurb.

Post by Douglas Schuch »

I bought a 12-string Sho-Bud off of Ebay a while back. I've been working on it slowly, but have some signs of progress so thought I would post pictures:

Before shot: believe me - the green is far uglier than the pic shows!:


Image


And after removing the fretboard - you can see it was originally blue. If it still was, I'd have left it:

Image

And after bleaching:

Image

And here it is after dying and spraying lacquer. This picture shows the true color best, I think, but of course it changes depending on the quality and angle of the light:

Image

And one more, taken today, after finishing polishing the metal and remounting some of it:

Image

Now to start adding pedals - aiming for 8x5.

Doug
User avatar
Scott Duckworth
Posts: 3464
Joined: 6 Apr 2013 8:41 am
Location: Etowah, TN Western Foothills of the Smokies
State/Province: -
Country: United States

Post by Scott Duckworth »

NICE! :mrgreen:
Amateur Radio Operator NA4IT (Extra)
http://www.qsl.net/na4it

I may, in fact, be nuts. However, I am screwed onto the right bolt... Jesus!
User avatar
Lane Gray
Posts: 13684
Joined: 4 Aug 1998 11:00 pm
Location: Topeka, KS
State/Province: -
Country: United States

Post by Lane Gray »

Sweet.
2 pedal steels, a lapStrat, and an 8-string Dobro (and 3 ukes)
More amps than guitars, and not many effects
User avatar
Micky Byrne
Posts: 2294
Joined: 15 Dec 2005 1:01 am
Location: United Kingdom (deceased)
State/Province: -
Country: United States

Post by Micky Byrne »

Just "BEAUTIFUL" :)

Micky "scars" Byrne U.K.
User avatar
Martin Weenick
Posts: 999
Joined: 23 Jul 2001 12:01 am
Location: Lecanto, FL, USA
State/Province: -
Country: United States

Sho-Bud

Post by Martin Weenick »

Douglas did you wipe on or spray on the dye ?? Looks really great !!
Several custom steels. NV-112 Boss DD-7
User avatar
Douglas Schuch
Posts: 1504
Joined: 10 Jun 2011 9:33 am
Location: Valencia, Philippines
State/Province: -
Country: United States

Post by Douglas Schuch »

Martin, I sprayed the dye. I was actually trying to get a bit more of a turquoise color, but I got too much green in the mix right from the start. I also got a little carried away spraying it on, so it's a bit greener and bit darker than intended, but I like it, and I'm learning!

Also, pics always lie a little - there are glitches in the finish that close examination show. But it is intended to be a player's 'Bud - look good, but no so perfect you are afraid to take it anywhere!

Thanks for the nice comments, guys! I look forward to playing it.
User avatar
Howard Steinberg
Posts: 604
Joined: 2 Mar 2012 8:46 am
Location: St. Petersburg, Florida , USA
State/Province: Florida
Country: United States

Post by Howard Steinberg »

Looks great. What did you use for a dye??
Justice Pro Lite (4-5), Justice D-10 (8-5)x2 , Quilter Steelaire, Hilton Pedal, BJ's bar.
User avatar
Dale Rottacker
Posts: 4138
Joined: 3 Aug 2010 6:49 pm
Location: Walla Walla
State/Province: Washington
Country: United States

Post by Dale Rottacker »

That looks really good Douglas, be fun to see when you're done...

About a hundred years ago I stripped an old fingertip done and dyed it...I can't say for sure but it might have been Bobbe Seymore or someone at Sho~Bud, anyhow he joked with me, that I wouldn't believe what they used for dye...he was right, it was food coloring, and under several coats of laquer it was gorgeos!!!

Good luck with finishing it, you've got a good start on it.

Dale
User avatar
Douglas Schuch
Posts: 1504
Joined: 10 Jun 2011 9:33 am
Location: Valencia, Philippines
State/Province: -
Country: United States

Post by Douglas Schuch »

Howard - I used leather dye (Fieblings)as I could get tints closer to what I was looking for and there seemed to be some issues with sending some types of dye to CA, where the freight forwarder I use is. Anyone doing this for the first time: add only a tiny bit of dye to the solvent (I used alcohol). You can always add more. A little goes a very long way!

I have a rather rough D-10 that is on its way to me as well, now - looks like the lacquer is coming off in some areas, so I am figuring a refinish on it as well. I have dye from Reranch coming in for it. I've learned that ReRanch and Steward-McDonald dyes are made by the same company:

http://www.homesteadfinishingproducts.c ... nsTint.htm

This company has more colors than either RR or S-M stock, so worth looking at if you don't find what you want with the other guys.
User avatar
chris ivey
Posts: 12703
Joined: 8 Nov 1998 1:01 am
Location: california (deceased)
State/Province: -
Country: United States

Post by chris ivey »

could you explain the bleaching process?

when i refinished a steel i just sanded off the old and sprayed on the new. no dyes involved.
would like more options for the next one.
User avatar
John Billings
Posts: 9344
Joined: 11 Jul 2002 12:01 am
Location: Ohio, USA
State/Province: Ohio
Country: United States

Post by John Billings »

It looks great Doug! Good job!
JB
User avatar
Howard Steinberg
Posts: 604
Joined: 2 Mar 2012 8:46 am
Location: St. Petersburg, Florida , USA
State/Province: Florida
Country: United States

Post by Howard Steinberg »

Thanks for the info Doug. I've informed my wife that a project such as this will be coming to our home in the foreseeable future. Howard
Justice Pro Lite (4-5), Justice D-10 (8-5)x2 , Quilter Steelaire, Hilton Pedal, BJ's bar.
User avatar
Douglas Schuch
Posts: 1504
Joined: 10 Jun 2011 9:33 am
Location: Valencia, Philippines
State/Province: -
Country: United States

Post by Douglas Schuch »

Chris, RE: the bleaching, per a previous post by James Morehead, and research into wood finishing techniques, the method that I used, and probably one of the best for aniline dyes, is household bleach. I used it full strength by soaking a rag, then wiping it on. Also, the bleaching was done in direct sunlight (which is VERY direct here in the tropics!). Leave the cabinet out in the sun to dry - the bleach will dissipate naturally in air and sun, same as it does from your laundry.

I know some woods bleach can attach the fibers in the wood, weakening it, but as far as I could tell, the maple on my guitar was unharmed/unaffected by the bleach and it removed most of the color. If the dye is put on before the finish (as opposed to being mixed into the finish), then the dye soaks into the grain, and sanding is not really practical as I suspect you would have to take too much wood off.

The bleach worked very quickly on the dye, but as you can see, there is still some residual color. Additional applications of bleach had little or no effect on that. You can see that it has a bluish cast where it was protected from the sun, and greenish/brown tint where it was exposed to UV. Because of this, felt I needed to stay in the blue/green color realm - doing something very different could have gotten interesting. The you can also see in the finished guitar a difference where there was UV exposure - those areas are more green, less blue, from the residual dye in the wood.

Of course, a light sanding after the bleach is needed - it did not seem to raise the grain much, but no doubt there was some.

I think the main thing I've learned from this project is a healthy respect for guys like Ricky and James who do this stuff professionally. I like learning, and I like doing my own work, but it does take lots of time and energy! I figure with the increase in value of a guitar like this, I might be making a couple dollars an hour! Those guys are worth every penny you pay them unless you truly enjoy the work!

Doug
Storm Rosson
Posts: 1407
Joined: 1 Oct 2009 4:16 pm
Location: Silver City, NM. USA
State/Province: -
Country: United States

Post by Storm Rosson »

:) I use Oxy-clean to bleach wood ,it works quite well also.Using NaOCl (clorox),leaves NaCl (table salt)in the wood if you don't rinse it after bleaching. This can interfere with some dyes/stains working properly. I never experience any probs though when I use Fiebings leather dye. ;-)
User avatar
chris ivey
Posts: 12703
Joined: 8 Nov 1998 1:01 am
Location: california (deceased)
State/Province: -
Country: United States

Post by chris ivey »

thanx doug.
User avatar
Will Hart
Posts: 99
Joined: 28 Jan 2006 1:01 am
Location: St. Croix, Virgin Islands
State/Province: -
Country: United States

Post by Will Hart »

Great job, Doug!
User avatar
Douglas Schuch
Posts: 1504
Joined: 10 Jun 2011 9:33 am
Location: Valencia, Philippines
State/Province: -
Country: United States

Post by Douglas Schuch »

Storn - I assume Oxy-clean is an oxalic acid product? Does it work on aniline dye? Oxalic acid is great for organic stains in wood, and will lighten some woods a little (sold as "teak brightener" in the yachting world).

I did rinse with clear water after the bleach, btw - should have mentioned that.
Storm Rosson
Posts: 1407
Joined: 1 Oct 2009 4:16 pm
Location: Silver City, NM. USA
State/Province: -
Country: United States

Post by Storm Rosson »

:) Douglas,it isn't an oxalic acid product (oxalic acid is toxic by the way)but an oxygen bleach. Primarily Sodium percarbonate Na2CO3.H2O2, as u can see when in solution ,this compound releases a nascent oxygen atom [O+] which is the active bleaching agent. AS far as I know aniline and indole type dyes do break down fom oxygenation, but the degree can be less than complete.Bleaching with this product should also be followed by a thorough fresh water rinse.
User avatar
Douglas Schuch
Posts: 1504
Joined: 10 Jun 2011 9:33 am
Location: Valencia, Philippines
State/Province: -
Country: United States

Post by Douglas Schuch »

Being a glutton for punishment, I have another Sho-Bud restoration project I've begun - this one a Pro II round-front. The finish was in very bad shape with large sections missing between the necks, and lots of cracks. Also (unknown when I bought it) the front apron had separated from the top at each end, pulled out by the screws through the front of the end-plate, which fit loose.

First the pics:

before:
Image


Image

You can see the apron sticking out beyond the top.

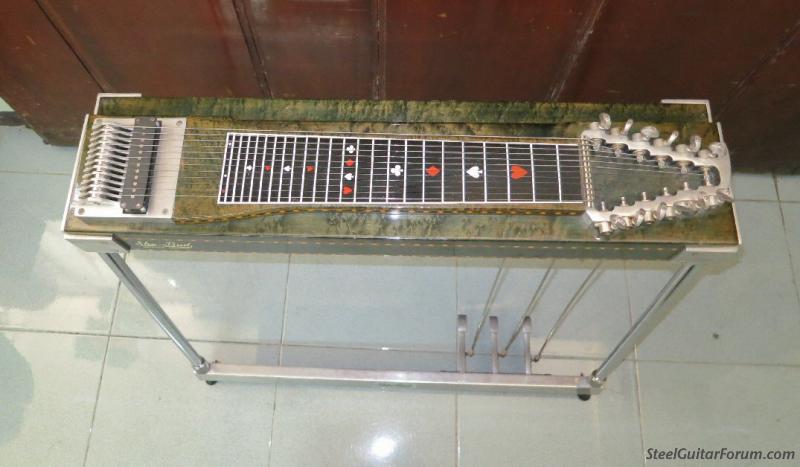
After: this pic was taken today, after stripping, bleaching, staining, and initial coats of lacquer. There will be many more coats of lacquer added, then I will rub it out to (hopefully) a glossy shine:


Image

Info on fixing the apron: I think the cause is the cabinet shrinking, so that the endplates fit loose. I have the opposite problem with my Zumsteel Uni that has been here in the warm, moist air of the Philippines for 2 years - the wood seems to be expanding, slightly opening up the joints where the mica meets in the corners. Fo bro Don Brown, who lives up the road a bit, has had the same problem with his Kline.

This Sho-Bud came from Taos, New Mexico, so perhaps the dry air there led to it shrinking. The amounts are very tiny - maybe 3/32" was the widest gap at the endplates. But that is enough to break the joint. This Sho-Bud does not have plugs in the apron like my 1975 12-string does - covering either screws or dowels (not sure what Sho-Bud used) which would have reinforced this joint.

Despite lacquer, laminate, etc, wooden instruments are not completely stable, so can expand and contract small amounts with changing conditions. To avoid the problems caused by this, as others have pointed out, avoid sudden changes of temp, and also try to keep the humidity from getting too low in winter where you keep your steel.

So, the fix - just removing the endplates let the wood return about 2/3rds of the way on its own in a few days. From there it was very easy to use clamps to bring it back into line and glue it up. First, bar clamp it from front to back, pulling the apron into alignment. Use blocks of wood not only for padding the clamps, but also by having them overlap the top edge the clamps can not pull the apron too far in (the reverse problem!) or break the back apron loose. Also, a clamp to hold the apron down against the top.

For glue, I used a good epoxy resin. I'm a boatwright, so am use to using epoxy on wood and know it is very strong (the joint is stronger than the wood). I am not familiar with whatever carpenter's glue would be available to me here in the Philippines. With epoxy, do not squeeze the clamps extremely tight - just snug them up so everything is is straight and tight - you don't want to squeeze all the resin out. Note: this is not epoxy glue you buy at the hardware store, but a better quality epoxy that is thinner (to penetrate the wood grain). WEST System is an excellent epoxy for wood available most places.

Whatever glue is used, be sure to mask the parts of the guitar that will be seen and wipe up glue that gets squeezed out before it sets up. Probably the trickiest part is getting the glue into the joint. I used a screwdriver to gently pry the joint open, propped the cabinet at an angle where the glue would run into the joint from the inside of the cabinet, then used a piece of plastic to push the epoxy into the joint.

I was planning on refinishing the guitar, but did the repair before stripping the cabinet - if epoxy gets on any unfinished wood, it will penetrate into the surface grain, and that area will not take stain like the rest of the instrument.

Finish - the blond is what you get when you bleach a brown-stained piece of maple - some of the stain remains in the grain, actually highlighting the grain far more than just leaving it natural. You can get this with a blond instrument by putting on a stain, then wiping most of it off. Fortunately, both James and one other person (sorry, don't know the name) have posted images of brown 'Bud's that have been stripped and bleached so I had a pretty good idea what the result would be. The stain in the bleached section ended up more pinkish-brown compared to the original brown, but that's ok - I wanted to do a reddish-brown on the aprons and neck, so they look good together.

The dark is ReRanch's "Dark Red Mahogany" - I just added a small portion of the bottle to a pint or so of alcohol and ended up with way more than I needed. It looks very brown when applied (after drying, anyway) but is more red once covered with lacquer.

I sprayed the stain on, but think if I did it again I'd just wipe it on. I put on too think a layer on the front apron on the first coat and the lacquer/stain ran, so ended up wiping it mostly off, the then re-applying stain with a rag, and was happy with how that worked.

After stripping the guitar and storing it for a bit here in the tropics before getting it refinished, it seems to have returned to its original size - endplates fit better now. Since I expect to continue living in the tropics, I do not think there will any further problem with shrinkage. If I moved to a dry climate I would watch for any signs of change, and loosen the screws slightly that go into the aprons from the front and back of the endplates. If you have a guitar that already has a gap between the wood and the endplates, I'd suggest shimming it between the endplates and the aprons - the gap will be there, but the stress on the apron will not be.

Well, that's probably way more info than most people want, but someone someday will find something useful in there somewhere!

So, now waiting for decals and other parts coming from the States.
Bringing steel guitar to the bukid of Negros Oriental!
User avatar
John Billings
Posts: 9344
Joined: 11 Jul 2002 12:01 am
Location: Ohio, USA
State/Province: Ohio
Country: United States

Post by John Billings »

Happy New Year Doug! Guitar looks very, very nice! Good info on the epoxy too.
Best,
JB
User avatar
Richard Sinkler
Posts: 17878
Joined: 15 Aug 1998 12:01 am
Location: Missoula
State/Province: Montana
Country: United States

Post by Richard Sinkler »

Doug. Did you finish the S12? How long did it take you?
Carter D10 8p/7k, Dekley S10 3p/4k C6 setup, Regal RD40 Dobro (D tuning), Recording King Professional Dobro (G tuning), NV400, NV112, Ibanez Gio guitar, Epiphone SG Special (open G slide and regular G tuning guitar) .

Playing for 55 years and still counting.
User avatar
Douglas Schuch
Posts: 1504
Joined: 10 Jun 2011 9:33 am
Location: Valencia, Philippines
State/Province: -
Country: United States

Post by Douglas Schuch »

Richard, I was not happy with the finish on the S-12, so I sprayed some more coats and tried to rub it out... and rubbed through the finish. So, that meant more coats and waiting another several weeks for it to dry enough to do it again! That's why it's called learning!

No big deal, though, as some parts went astray on a previous order, so it is waiting for the replacements from James that are on the way now. I had hoped to have both done about now, but if I got everything I hoped for, I'd be spoiled rotten! I'm now hoping to have them both done before I leave the Philippines in 3 months... but will settle for just having all the parts in one place!

I'm enjoying the ride!
Bringing steel guitar to the bukid of Negros Oriental!
Skip Edwards
Posts: 3107
Joined: 1 Dec 1998 1:01 am
Location: LA,CA
State/Province: -
Country: United States

Post by Skip Edwards »

Love the blonde/brown two-tone finish. IMO that's how Sho~Buds look the best.
Nice work.
User avatar
Will Hart
Posts: 99
Joined: 28 Jan 2006 1:01 am
Location: St. Croix, Virgin Islands
State/Province: -
Country: United States

Post by Will Hart »

Have Buds Will Travel

A beauty, Doug.
J R Rose
Posts: 2764
Joined: 13 Mar 2009 12:39 pm
Location: Keota, Oklahoma, USA
State/Province: Oklahoma
Country: United States

Post by J R Rose »

Thank you for all the information. You've done a great job. In my years gone past I have done some of this kind of rework but never had anyone or anything to turn to for help. This Forum is a Wonderful thing.
My Thanks to bOb. J.R. Rose