Restoring my Fender T-8

Lap steels, resonators, multi-neck consoles and acoustic steel guitars

Moderator: Brad Bechtel

Ron Landis (RIP)
Posts: 178
Joined: 9 Aug 2012 3:32 pm
Location: Arkansas, USA
State/Province: Kansas
Country: United States

Restoring my Fender T-8

Post by Ron Landis (RIP) »

I may have got a bit over my head on this one. I'm happy to say my fretboard restorations are coming along. These were deeply scratched and pitted and I wasn't very careful removing them so there were a lot of bends that needed straightening and pits I could burnish out from the backside before I got to sanding out the pits and oxidation.

Then I masked it all off with clear packing tape and carefully cut around all the frets and markers. Then just dust on several coats of flat black enamel and it's not bad, not perfect, but a lot more attractive than the scratched and dented up junk I started with.

The body is almost ready and since I had to plug a hole in one of the tuning pans, I'm re-plating them and the pickup plates as long as I'm at it. That's a whole nother story in itself.

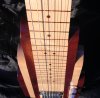
This picture shows one in the process of sanding out the scratches the other is the finished fretboard.

Image
User avatar
Dave Bader
Posts: 175
Joined: 4 Nov 2007 7:45 am
Location: Pennsylvania, USA
State/Province: Pennsylvania
Country: United States

Post by Dave Bader »

That looks great. Just so you know, you can buy replacement boards from Bobbie Seymour if you get stuck. They are not exact replicas but are pretty close. They are slightly larger in width and come with sticky backs. I'm going to try your method on a board I have.
Ron Landis (RIP)
Posts: 178
Joined: 9 Aug 2012 3:32 pm
Location: Arkansas, USA
State/Province: Kansas
Country: United States

Post by Ron Landis (RIP) »

Dave, I did order three of them and discovered they are 1/4" wider than the originals. Bobby said they were copied from the original but they don't match any of my Stringmasters. I think they may be for Fender pedal steels. In any case, they are not acceptable for a restoration since they stick out over the edge of the wood very slightly. This is why I wasn't very careful removing the original fretboards. I was planning to scrap them.
Kevin Hatton
Posts: 8233
Joined: 3 Jan 2002 1:01 am
Location: Buffalo, N.Y.
State/Province: -
Country: United States

Post by Kevin Hatton »

Nice Ron. Excellent.
User avatar
Bob Gibler
Posts: 188
Joined: 16 Apr 2013 8:30 am
Location: Kansas, USA
State/Province: Kansas
Country: United States

Reproducing Fret boards

Post by Bob Gibler »

Ron,
I Think you have done a great job of repairing your Boards, I don't know if you saw my thread on the Wright Quad resto. But I was able to get my Aluminum Boards reproduced to exact scale with lazer etching on the Aluminum. And then shooting a thin layer of Clear Lacquer and they look original. The bottom 4 are the original scratched up Boards with tags and the top 4 are the lazer etched Boards. The cost for 4 boards and two name plaques was around $120.00. Well worth it to me. Again Nice job on the Boards you had to repair. I can not wait to see more pic's

Image
Ron Landis (RIP)
Posts: 178
Joined: 9 Aug 2012 3:32 pm
Location: Arkansas, USA
State/Province: Kansas
Country: United States

Post by Ron Landis (RIP) »

Wow, those look perfect. Actually, the used ones don't look too bad. I'm looking into having some reproduced into an etched aluminum plate and enameled like the originals. Thanks for the info. That will give me a good base price to compare with.

I wanted to have some shots of the painted body with the decal, but I tried to get too fancy and may have to refinish the back neck again.

I will show you this... it's a repair on the tuning pan. It was pretty common for guys to adapt string benders to these things, and it usually involves drilling holes in the tuning pan. This is one way to patch them although I'll probably do it over with some silver braze.

First, I ground an undercut all the way round the hole with a diamond bit.


Image

Then I cut out a piece of cupronickel from a five cent coin...

Image

Then hammered it with a rounded punch. As the nickel is hammered, it moves outward and locks into the undercut.

Then, it's smoothed and polished from there.

Image
User avatar
Bob Gibler
Posts: 188
Joined: 16 Apr 2013 8:30 am
Location: Kansas, USA
State/Province: Kansas
Country: United States

Post by Bob Gibler »

Ron,
The Aluminum blanks look much better than the old ones.. this pic does not do the results justice. Also using a coin is pretty neat idea....:-)
Amazing what a little Lateral Thinking can do ..Great Ideas usually start there. String benders were the rage back in the day before the push pull technology we have today. you can polish the pan out pretty easily and it will look great. you are doing a great job.. It makes me wish I had another project to work on..... OK I am going to have to find one now,,,Lol keep up the great work. Looking forward to more pic's :) :) :)
Ron Landis (RIP)
Posts: 178
Joined: 9 Aug 2012 3:32 pm
Location: Arkansas, USA
State/Province: Kansas
Country: United States

Post by Ron Landis (RIP) »

The steel on some of the parts were blistered and starting to rust under the plating so I decided to have them rechromed. The plater I went to wasn't equipped to strip nickel, but they did strip the chrome. I purchased some Brownell's room temperature nickel stripper to remove the nickel leaving me with just the copper plating left.

Some of the rust is too deep in spots to sand out so I thought I could cover it up with some Western style engraving. This is some practice engraving I did on a section on the underside to see what it would look like and to get the feel of the material before I do it on the side that shows..
Image
User avatar
Bob Gibler
Posts: 188
Joined: 16 Apr 2013 8:30 am
Location: Kansas, USA
State/Province: Kansas
Country: United States

Post by Bob Gibler »

Ron, That is incredible. I never would have thought to do something like that on steel parts..I would have bronze welded in the pits, and taken it down to the base metal. But your Idea is "AWESOME" It takes a steady hand to do that kind of work. I have carved leather for many years, But to be able to engrave metal.......Not Me..Lol. You did a nice job I like. :D :D :D :D :D :D
User avatar
Stephen Cowell
Posts: 3061
Joined: 6 Jan 2012 8:13 am
Location: Round Rock, Texas, USA
State/Province: Texas
Country: United States

Post by Stephen Cowell »

That is absolutely lovely... Ron, do you do this for money? Like, my money? *Want*.
Too much junk to list... always getting more.
User avatar
Russ Cudney
Posts: 138
Joined: 9 May 2007 4:31 pm
Location: Sonoma, California, USA
State/Province: California
Country: United States

Post by Russ Cudney »

Ron Landis wrote:The steel on some of the parts were blistered and starting to rust under the plating so I decided to have them rechromed. The plater I went to wasn't equipped to strip nickel, but they did strip the chrome. I purchased some Brownell's room temperature nickel stripper to remove the nickel leaving me with just the copper plating left.

Some of the rust is too deep in spots to sand out so I thought I could cover it up with some Western style engraving. This is some practice engraving I did on a section on the underside to see what it would look like and to get the feel of the material before I do it on the side that shows..
Image
Looks good. Nice touch.
1958 D8 Stringmaster, 1958 T8 Stringmaster, 1955 Q8 Stringmaster (in basket), 1949 Gibson BR9, 1953 Silvertone, 1957 Harmony H4 (yeah the cool black pearloid one), 1947 National Princess, 1969 Shobud S10 3X1
Ron Landis (RIP)
Posts: 178
Joined: 9 Aug 2012 3:32 pm
Location: Arkansas, USA
State/Province: Kansas
Country: United States

Post by Ron Landis (RIP) »

Thanks. Of course, that was just a small sample for practice. I haven't done this style of engraving for many years. Anyway, here is a shot of the real engraving done for the middle neck. I'll have it chrome plated after I finish the rest of the metal work. Since it's a triple neck, I'll have to engrave two more just like like it. The bottom part will be different on all three plates since the controls are different on all of them, but the borders and upper part will be the same on all of them.

Stephen, funny you should mention that. I originally went to a trade school to learn hand engraving over thirty years ago so that I could engrave the banjos I was building at the time. I got side tracked and only engraved two banjos. I may be interested in taking on some custom work but I would have no idea what to charge for it. I have a pretty neat thing going in the numismatic world carving coins and dies so I would probably have to take a cut in pay if I ever decided to get back into instrument engraving again. Two things are for sure, I love steel guitars and I love engraving, so I would never say never. In other words, you can pencil me in for a definite maybe on that. :wink:

Image
User avatar
Bob Stone
Posts: 1800
Joined: 7 Aug 1998 12:01 am
Location: Gainesville, FL, USA
State/Province: -
Country: United States

Post by Bob Stone »

Ron,

Your craftsmanship is wonderful. The engraving is really cool and seems especially appropriate for an old Stringmaster.

Break out the Nudie suits!

Please continue to keep us posted.

All the best,

Bob
Ron Landis (RIP)
Posts: 178
Joined: 9 Aug 2012 3:32 pm
Location: Arkansas, USA
State/Province: Kansas
Country: United States

Post by Ron Landis (RIP) »

I worked out the design for the tuning pans and engraved the one I had patched earlier. I'll engrave the other two to match this one. I plan to bead blast the inner part of the pan rather than try to polish it. This one still has a lot of the copper plating on it but it doesn't really matter since it will have more copper put on as the first part of the re-plating process.

All the while I've been doing the sanding and refinishing on the wood. I had some set backs and had to re-do a few areas, but the necks are almost ready to polish out. I don't mind spending lots of time on that part so the finish has plenty of time to dry between coats. I want to build up more of a clear overcoat before the final sand and polish.

Image
User avatar
Tom Pettingill
Posts: 2246
Joined: 23 Apr 2007 11:10 am
Location: California, USA (deceased)
State/Province: California
Country: United States

Post by Tom Pettingill »

Beautiful work Ron! :D
Ron Landis (RIP)
Posts: 178
Joined: 9 Aug 2012 3:32 pm
Location: Arkansas, USA
State/Province: Kansas
Country: United States

Post by Ron Landis (RIP) »

I got it polished and partially reassembled this weekend. I sent all the hardware off to the plater's shop. I thought it would be cheaper just to make new diamond trim parts out of solid German silver and keep the originals intact since they're in pretty decent shape. I've got quite a bit of engraving left to do on it after I get the stripped parts back. I decided to do the bridge covers and leg brackets. I figured as long as I went this far I may as well give it the full treatment.
Image
Image
User avatar
Andy Volk
Posts: 10527
Joined: 4 Aug 1998 11:00 pm
Location: Boston, MA
State/Province: Massachusetts
Country: United States

Post by Andy Volk »

Ron, that is truly beautiful engraving work and as Bob said, it really seems to suit an old Fender.
Steel Guitar Books! Website: www.volkmediabooks.com
User avatar
Nate Hofer
Posts: 536
Joined: 4 Nov 1998 1:01 am
Location: Overland Park, Kansas
State/Province: Kansas
Country: United States

Post by Nate Hofer »

Ron. That is incredible. What a cool way to personalize a vintage instrument without painting a cheesy name on the front. I'm a fan!
User avatar
Andy Volk
Posts: 10527
Joined: 4 Aug 1998 11:00 pm
Location: Boston, MA
State/Province: Massachusetts
Country: United States

Post by Andy Volk »

I know zero about engraving but I bet lots of folks would want something like this. Is it possible to hand engrave the prototype than have a laser engrave them or etch them via acid? Again, beautiful, inspiring work.
Steel Guitar Books! Website: www.volkmediabooks.com
User avatar
Rick Aiello
Posts: 5043
Joined: 11 Sep 2000 12:01 am
Location: Berryville, VA USA
State/Province: -
Country: United States

Post by Rick Aiello »

That is flat out stunning .... :whoa:
Ron Landis (RIP)
Posts: 178
Joined: 9 Aug 2012 3:32 pm
Location: Arkansas, USA
State/Province: Kansas
Country: United States

Post by Ron Landis (RIP) »

Thanks guys, I must say I'm pretty happy with the way it's coming along so far. Andy, there are several ways that this can be done in a production situation, but most of them end up looking pretty flat or machine made.

True hand engraving has depth and form in the cuts and the graver can be polished so the cuts are a flashy mirror finish. That is about impossible to reproduce into metal using mechanical means or acid etching.

I think the key to offering this on a production model would be to do it in a style that can cover large areas in relatively short time. Plus, having a set pattern that is repeated could do away with doing the layout by hand for each piece. The other alternative would be the standard for hand engravers... just do really good work and charge a whole bunch for it.

I am working on making solid german silver components that won't need plating and can be polished and engraved. I am discovering that it's almost easier to make new tuning pans and control plates than to have the originals stripped, polished and re-plated. The cupronickel components will never rust and they can be made to fit any pickup the player wishes.

Like if you want to modernize your old push button Stringmaster, you could order a new pickup plate from us (me) with any hole configuration for switches, for example. Or, if you want to customize your guitar, order some custom diamonds with your name or band logo. You still have your originals if you decide to sell it. I'm sort of thinking out loud, but I think there may be a market here on a limited degree for some very high quality custom steels.

I'm just to a point in my life I want to branch out with my engraving and get back to my roots a bit. I'm having a lot of fun with this project, and in general the steel guitar has been a great avenue for that for me both musically and artistically. I've got lots of ideas for some themes that can be incorporated into some one-offs, etc. but it's all just daydreaming at this point. But thank you all for the positive remarks.
Last edited by Ron Landis (RIP) on 23 Dec 2013 6:49 pm, edited 1 time in total.
User avatar
Stephen Cowell
Posts: 3061
Joined: 6 Jan 2012 8:13 am
Location: Round Rock, Texas, USA
State/Province: Texas
Country: United States

Post by Stephen Cowell »

I'm wondering how the parts will fare after plating... I'm guessing that some detail will be lost after the process. This would make the silver parts even more desirable... let's wait and see, silver *is* high maintenance.

And if you're looking for folks to put on a prospective customer list, count me in!
Too much junk to list... always getting more.
Ron Landis (RIP)
Posts: 178
Joined: 9 Aug 2012 3:32 pm
Location: Arkansas, USA
State/Province: Kansas
Country: United States

Post by Ron Landis (RIP) »

Stephen, the plating fill is something I'm curious about as well. I trust the guy I'm going to though. I guess it's just wait and see. The cupronickel isn't like silver. It would be comparable to nickel plating as far as color and the way and rate it will oxidize. It engraves about like the mild steel - a bit better perhaps, but that in turn it can be directly chrome plated very cheaply for a durable finish that will never bubble under the plating and without any noticeable fill in the detail. In fact, coining dies and printing plates are often chrome plated for the hardness. It's a very thin layer.

The problem with all these old chrome parts is that the steel is first plated with copper as a base coat. Then nickel and finally, a flash of chrome. The steel and copper together can cause electrolysis that can start the corrosion of the steel underneath the chrome.