| Author |
Topic: Sho-Bud restore |
Joe Romanchick
From:
Pennsylvania, USA
|
 Posted 25 Oct 2023 12:36 pm
 |
|
I picked up a 73 Sho-Bud Pro and among other things the cabinet finish was starting to suffer. The mechanics needed work also and it has 3 knee levers and I wanted 4. So the only thing left for me to do was a restoration. I have fooled with these things a while back and wanted to get going again so here I am. The finish on the front was pretty bad and besides the normal cracking it was faded a lot. I show a picture of it, and in person it looked bad, at least for me. I am going to refinish in lacquer but also more red than the original. Then all the metal parts will be cleaned, polished and painted as necessary. On assembly everything will be tightened up and changed to Emmons setup, which it is not now.


 |
|
|
|
Ricky Davis
From:
Bertram, Texas USA
|
Posted 25 Oct 2023 1:27 pm
|
|
I will say for historical purpose. That "Green Tint" that was added to the normally white spray texture to the underneath; was ONLY on all models Shobud made during the first year inception of the "LDG" from May 1973 to May 1974. So just cleaning that underneath and not stripping it; will continue that celebration of the new Model's fist year. They started doing that just shortly after Lloyd's was built as his is still white and mine being the 2nd is also white; but not long after they started adding the Green tint to all models they built for that first year.
Ricky
_________________
Ricky Davis
Email Ricky: sshawaiian2362@gmail.com |
|
|
|
Joe Romanchick
From:
Pennsylvania, USA
|
Posted 25 Oct 2023 3:55 pm
|
|
| Ricky Davis wrote: |
I will say for historical purpose. That "Green Tint" that was added to the normally white spray texture to the underneath; was ONLY on all models Shobud made during the first year inception of the "LDG" from May 1973 to May 1974. So just cleaning that underneath and not stripping it; will continue that celebration of the new Model's fist year. They started doing that just shortly after Lloyd's was built as his is still white and mine being the 2nd is also white; but not long after they started adding the Green tint to all models they built for that first year.
Ricky |
Well thank you for that info. I had marked the holes that were no longer going to be used and was going to fill them and refinish that also. I still would like to go with a lighter more red color on the ouside though because I just do not like the original color...... |
|
|
|
Ricky Davis
From:
Bertram, Texas USA
|
Posted 25 Oct 2023 4:58 pm
|
|
yeah I never liked many colors the professionals and pro II's had; I ONLY liked the two-tone ones they finished. But the underneath was all I was commenting on; it's yours so do what you think is a very awesome finished inside and out.....Make it look great for you and make is play/sound great for us/audience; that is all a pedal steel guitar is designed to be.
Ricky
_________________
Ricky Davis
Email Ricky: sshawaiian2362@gmail.com |
|
|
|
Joe Romanchick
From:
Pennsylvania, USA
|
Posted 25 Oct 2023 6:56 pm
|
|
I also like the two tone ones, with the natural wood with contrasting color but the wood on this one is not that nice. So it will get all red which is a whole lot better than it was. I also am concerned with the sound and playability and will deal with that. The changer was pretty cruddy as would be expected after all these years. Two of the knee levers matched but are straight, so I was able to get two more that match those.
I am 78 and I wanted a Sho-Bud project and now I am not sure about the underneath color because of all the extra holes that are there from previous changes, so they may still be closed off...... |
|
|
|
Ricky Davis
From:
Bertram, Texas USA
|
Posted 26 Oct 2023 6:34 am
|
|
| Quote: |
| So it will get all red which is a whole lot better than it was. I also am concerned with the sound and playability and will deal with that |
Well certainly stay with the single/single changer that is originally in the Professional and the SOUND will stay awesome. Those are the best sounding fingers Shobud EVER made; with the 6061 aluminum finger tops with pin to hook string on.
Playability?? yes...Make sure everything moves silky smooth before even putting rods back in.
Ricky
_________________
Ricky Davis
Email Ricky: sshawaiian2362@gmail.com |
|
|
|
Joe Romanchick
From:
Pennsylvania, USA
|
Posted 26 Oct 2023 3:59 pm
|
|
I did hear it and that is why I want to put some time into it and it is very nice. What it needs is some love. What I meant when I said I was concerned about the sound and playability is I am not only going to make it look good, but it will also play good.
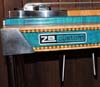
I did a little more on it and was able to make it two tone, it is red and amber. It is only in the beginning stages now and I will be putting many more coats of lacquer on it. I also have a set of decals that I got many years ago and it will even have them.....


 |
|
|
|
Ricky Davis
From:
Bertram, Texas USA
|
Posted 26 Oct 2023 4:48 pm
|
|
Looking great Bro...continue on.
Ricky
_________________
Ricky Davis
Email Ricky: sshawaiian2362@gmail.com |
|
|
|
Eric Dahlhoff
From:
Point Arena, California
|
Posted 26 Oct 2023 9:13 pm Nice ShoBud
|
|
I love that color combo! Good choice!
_________________
"To live outside the law you must be honest." (Bob Dylan) |
|
|
|
Dave Grafe
From:
Hudson River Valley NY
|
Posted 27 Oct 2023 11:25 am
|
|
| Outstanding so far! |
|
|
|
Joe Romanchick
From:
Pennsylvania, USA
|
Posted 27 Oct 2023 12:52 pm
|
|
I got the decals on and they were a challenge. I purchased them about 10 years ago and trying to install them now was difficult at best. They were cracking under the slightest pressure. I had 2 sets and used them both trying to get them right. I had to touch up with white paint in spots because of cracking and just falling apart. Anyway, after letting them set overnight I then put 4 more coats of clear lacquer on. Next I will wetsand and give a few more coats and onto polish.
I also started to polish parts. The changers were polished and were also cleaned in an ultrasonic cleaner. As you can see there is complete disassembly and cleaning. The tuners were removed and also the brass rollers and cleaned and put back together. Endplates were polished. There were some deep scratches but it looks a lot better now.
If there are too many pictures and info about this restore, let me know and I will stop.........


 |
|
|
|
Eric Dahlhoff
From:
Point Arena, California
|
Posted 27 Oct 2023 4:54 pm
|
|
Really nice looking!
What do you use to polish the metal parts? By hand? A buffer?
Not too many pics - I love seeing restorations 
_________________
"To live outside the law you must be honest." (Bob Dylan) |
|
|
|
Joe Romanchick
From:
Pennsylvania, USA
|
Posted 27 Oct 2023 7:34 pm
|
|
| I use a buffer and sandpaper if necessary for deep scratches, and then red rouge. My buffer is an old Craftsman 2 wheel grinder with cloth wheel. For polishing the lacquer a slow polisher or just wet sanding and hand polish with DuPont compound. I had a body shop about 100 years ago. There is no rocket science here, just good old fashioned elbow grease and basic tools. I will keep the pictures coming...... |
|
|
|
Bobby D. Jones
From:
West Virginia, USA
|
Posted 27 Oct 2023 8:04 pm
|
|
| That is great work on all parts. May is sound as good as it looks in its new life. |
|
|
|
Joe Romanchick
From:
Pennsylvania, USA
|
Posted 31 Oct 2023 12:59 pm
|
|
I finished the clear lacquer and polished it out. I tried to show in the pictures that it has really nice grain but no matter how I photograhed it, it would not show. So here are a couple more npictured with a shine on it now, and I placed a few of the metal parts on it to get an idea of how it will look. What I just realized is when I was trying to put on the decals and they were falling apart and on my second and last try which was the last of what I had, I placed the decal on the right a little further over than it should be and it is what it is now. It really bothers me but there is nothing I can do anymore. I got so flustered when I was installing them and worried I may not be able to use them, I was concentrting on getting them off the paper and on the body.
Now it is on to cleaning and polishing parts and installing them. I also will be adding the fourth knee lever and maybe some other changes. Everything will be adjusted and set up as I go. I did polish the pedal bar but it had some pretty deep scratches in it, but looks way better than it did,and I am working on the pedals now. Also the one end plate had some pitting in it that I could not remove, but it also looks way better than it did. All in all it is shaping up very nicely and should be a really nice looking steel.

 |
|
|
|
John Hyland
From:
South Australia
|
Posted 31 Oct 2023 1:04 pm
|
|
| Joe. Looks good. What type of clear finish did you use? |
|
|
|
Joe Romanchick
From:
Pennsylvania, USA
|
Posted 31 Oct 2023 5:01 pm
|
|
John,
I used Mohawk Classic Instrument lacquer clear gloss. It is pretty good stuff and it sprays nice. No thinning. After you get a few good coats on, then wet sand and some more spraying until it seems satisfactory to you. Final is light sand with Ultra Fine color sandpaper. Then I hand rubbed it with Turtle Wax Compound which is pretty coarse and machine polishing is too aggressive which I tried. After that you use Meguiars Mirror Glaze put on with a machine and a very fine foam pad. This is a typical lacquer job. |
|
|
|
Kenny Davis
From:
Great State of Oklahoma
|
Posted 31 Oct 2023 5:26 pm
|
|
Really nice Joe!
What's the timeline? How long have you been working on it?
_________________
Best lyric in a country song: "...One more, Moon..." |
|
|
|
Joe Romanchick
From:
Pennsylvania, USA
|
Posted 31 Oct 2023 6:06 pm
|
|
Kenny,
I guess on and off a little over a week. |
|
|
|
Kenny Davis
From:
Great State of Oklahoma
|
Posted 31 Oct 2023 8:54 pm
|
|
Get ready for a deluge of folks wanting their guitars refinished! Previously having a body shop and not using Nitrocellulose lacquer has some major benefits. A lot of progress for just a week!
I have a couple of '71 Mach 1's that could use a little help 
_________________
Best lyric in a country song: "...One more, Moon..." |
|
|
|
John Ducsai
From:
New Hampshire, USA
|
Posted 1 Nov 2023 4:25 am
|
|
Looks amazing Joe !!  |
|
|
|
Joe Romanchick
From:
Pennsylvania, USA
|
Posted 1 Nov 2023 5:27 am
|
|
| Thanks for all the comments, they are appreciated. I have been making, building, restoring and fabricating things my whole life, so things like this are easy for me. I just wish I had the ambition I had when I was younger.............. |
|
|
|
Ricky Davis
From:
Bertram, Texas USA
|
Posted 1 Nov 2023 6:41 am
|
|
SUPER GREAT work Joe; it's looking amazing. Continue on my Brother.
Ricky
_________________
Ricky Davis
Email Ricky: sshawaiian2362@gmail.com |
|
|
|
Joe Romanchick
From:
Pennsylvania, USA
|
Posted 1 Nov 2023 1:08 pm
|
|
I started working on the changers. I really can't see any appreciable wear on anything so far. It must have sat under a bed for a long time. Anyway, I have degreased it and will be shiningthe parts up a bit before I assemble them. What I did find is some of the springs are not too my liking, so I am going to replace all the springs.
Just a note to anyone interested is that after using a wheel on the aluminum parts, a final polish with "Mothers Aluminum and mag polish" really makes them look good. Maybe you have your own special polish, so I am not saying this is the best, but just passing along my thoughts. I am not affiliated with them in any way............
 |
|
|
|
Ricky Davis
From:
Bertram, Texas USA
|
Posted 1 Nov 2023 1:37 pm
|
|
Oh Joe I've been a huge "Mothers" fan now going on 28 years of use for final aluminum polish...yeehaaaa...
Ricky
_________________
Ricky Davis
Email Ricky: sshawaiian2362@gmail.com |
|
|
|