| Author |
Topic: Carter Copedent Change Help |
Dan Robinson
From:
Colorado, USA
|
 Posted 2 May 2020 7:29 pm
 |
|
I'm going to change three knee-levers on my Carter SD-10. Have not done anything like this before. I'll be jumping into the deep end, but this really needs to happen.
Will move (1) E-lowers from RKR to RKL, (2) string 2&9 lower from LKR to RKR, (3) 1&2 raise/6 lower from RKL to LKR (split on string 6 with B-pedal).
I could use some advice on how to go about this. When reconnecting levers in new configuration is it important to work in a certain order, such as connecting lowering rods first, then raises? Or work on one lever at a time?
I've always been good at taking things apart. Putting them back together... not so much. |
|
|
|
Jim Palenscar
From:
Oceanside, Calif, USA
|
Posted 2 May 2020 7:40 pm
|
|
| Note where each rod is both in the bellcrank and the changer and simply put them back in the same place. Do the raises 1st as the lower rods will obscure there the raises go. Take your time- it will work out fine. |
|
|
|
John Drury
From:
Gallatin, Tn USA
|
Posted 2 May 2020 8:36 pm
|
|
Whip out the cell phone and take a few pix of the changer end showing where all your pulls are located now.
Also pix of the bellcranks that are affected, where they connect.
_________________
John Drury
NTSGA #3
"Practice cures most tone issues" ~ John Suhr |
|
|
|
Richard Sinkler
From:
aka: Rusty Strings -- Missoula, Montana
|
Posted 3 May 2020 2:34 am
|
|
Just a word of caution. The torx screws that are in the bell cranks strip very easily. They are in there tight. Get a good quality t-handle torx wrench. I found that putting torx wrench into the head and tapping with a hammer helps. To me, those screws are the worst part of working on a Carter. Even worse than the dog bones (pull pins).
_________________
Carter D10 8p/8k, Dekley S10 3p/4k C6 setup,Regal RD40 Dobro, NV400, NV112 . Playing for 54 years and still counting. |
|
|
|
Gene Tani
From:
Pac NW
|
Posted 3 May 2020 5:14 am
|
|
Oh, yeah, torx screws, dogbones and lever reversers 
#10 torx bit and absolutely resist the tempation to angle the torx driver around pull rods over the screw, then you'll have to dremel a slot into that screw
Make a rod chart, take lots of pictures and peruse what's on Carter's site, if you have 4/2 fingers you'll have to adapt:
http://steelguitar.com/roddingS10_D10.html
http://steelguitar.com/rodding.html
http://steelguitar.com/roddingBlank.html
_________________
- keyless Sonny Jenkins laps stay in tune forever!; Carter PSG
- The secret sauce: polyester sweatpants to buff your picks, cheapo Presonus channel strip for preamp/EQ/compress/limiter, Diet Mountain Dew |
|
|
|
Dan Robinson
From:
Colorado, USA
|
Posted 3 May 2020 9:12 am Dog-Bone Swap
|
|
Ordered a Klein T10 T-handle wrench. Plenty to do before it arrives. I'll turn it over today and start the rodding chart.
I don't know if any involved pulls are coupled to another cross shaft.
DOG-BONES: PITA
Placing dog-bones in the bell cranks was my biggest frustration when I retimed some pulls a while ago. I'll be swapping them out for these replacement parts I got from Bill Liscomb:
https://bb.steelguitarforum.com/viewtopic.php?p=2901029&highlight=#2901029

I suppose I should have extra pull rods on hand. IIRC, they can be made from 3/32" welding rods. I'm leaning towards mild-steel over stainless for ease of cutting threads, and better grip for set screws on the dog-bone replacement barrels. Tell me if I'm wrong.
What's die is needed to cut tuning rod threads? |
|
|
|
Gene Tani
From:
Pac NW
|
Posted 3 May 2020 10:31 am
|
|
https://bb.steelguitarforum.com/viewtopic.php?t=315054
Woops forgot about Bill Liscomb's bones, I've also been replacing torx screws with cap head allen screws which block lowest hole on bellcrank a little more..
Also forgot to say don't over tighten the set screws that adjust lever travel, i've read those aren't that strong. I think that was a 3/32" allen key for that
_________________
- keyless Sonny Jenkins laps stay in tune forever!; Carter PSG
- The secret sauce: polyester sweatpants to buff your picks, cheapo Presonus channel strip for preamp/EQ/compress/limiter, Diet Mountain Dew |
|
|
|
Tucker Jackson
From:
Portland, Oregon, USA
|
|
|
|
Dan Robinson
From:
Colorado, USA
|
Posted 3 May 2020 6:58 pm
|
|
I made a rodding chart and started tearing it down. This guitar has 4R/2L changer fingers. I can see I'll need to remove most, if not all of the tuning rods to reposition bell cranks. So far no trouble easing out the torx screws. There's no turning back now.
Trial with Bill Liscomb's retaining barrel's looks good. The rods are still long enough after removing the hook. And no more interference with the torx screw head. |
|
|
|
Gene Tani
From:
Pac NW
|
Posted 3 May 2020 10:30 pm
|
|
Torx screws, yeah push down firmly and push up on the cross shaft with about equal force, haven't stripped any that way but mine don't have loctite
https://bb.steelguitarforum.com/viewtopic.php?p=2267524
https://bb.steelguitarforum.com/viewtopic.php?p=2424920
If you get stuck, you can ask Al Brisco by email.
I have 2 half feel stops, RKL and RKR (2nd string lower but no splits. I've so far been taken the lazy/expensive approach, I bolt new bellcranks on but i leave the old ones where they are
_________________
- keyless Sonny Jenkins laps stay in tune forever!; Carter PSG
- The secret sauce: polyester sweatpants to buff your picks, cheapo Presonus channel strip for preamp/EQ/compress/limiter, Diet Mountain Dew |
|
|
|
Richard Sinkler
From:
aka: Rusty Strings -- Missoula, Montana
|
Posted 4 May 2020 3:25 am
|
|
| Dan Robinson wrote: |
I made a rodding chart and started tearing it down. This guitar has 4R/2L changer fingers. I can see I'll need to remove most, if not all of the tuning rods to reposition bell cranks. So far no trouble easing out the torx screws. There's no turning back now.
Trial with Bill Liscomb's retaining barrel's looks good. The rods are still long enough after removing the hook. And no more interference with the torx screw head. |
You don't need to remove all the rods, just loosen the torx screw, and slide the bell crank off the cross shaft. Slide it back on where you want it. Removing the other rods will make it much easier though. I only removed rods that prevented me from placing the bellcrank on the cross shaft.
_________________
Carter D10 8p/8k, Dekley S10 3p/4k C6 setup,Regal RD40 Dobro, NV400, NV112 . Playing for 54 years and still counting. |
|
|
|
Dan Robinson
From:
Colorado, USA
|
Posted 4 May 2020 7:31 pm
|
|
| Richard Sinkler wrote: |
| You don't need to remove all the rods, just loosen the torx screw, and slide the bell crank off the cross shaft. Slide it back on where you want it. Removing the other rods will make it much easier though. I only removed rods that prevented me from placing the bellcrank on the cross shaft. |
Yeah, could avoid removing a few. Then I looked at the horrible grime on my fingers from those I handled.
The removable metal parts, bell cranks, dog-bones and rods are filthy. The black greasy stains on the wood are a downer. Underside of the cabinet deserves a proper cleaning.
Everything is coming off. Just three rods to go. I'll clean the metal parts and the wood.
With a naked undercarriage I might as well polish the cross-shafts and knee-levers. Is California Custom PURPLE METAL POLISH a good choice? |
|
|
|
Gene Tani
From:
Pac NW
|
Posted 5 May 2020 7:23 am
|
|
I googled this "site:steelguitar.com polish changer finger"
and 1st hit "WARNING: Do NOT polish anodized aluminum or chrome- ..." but confusing what to do and not to do
http://steelguitar.com/stringBreakage.html
_________________
- keyless Sonny Jenkins laps stay in tune forever!; Carter PSG
- The secret sauce: polyester sweatpants to buff your picks, cheapo Presonus channel strip for preamp/EQ/compress/limiter, Diet Mountain Dew |
|
|
|
Tucker Jackson
From:
Portland, Oregon, USA
|
Posted 5 May 2020 7:28 am
|
|
Those comments are about changer fingers. You can polish Carter changer fingers, of course, if you do it correctly... and are careful to not change the radius of the finger.
Don't know if the glossy undercarriage crossbars can take a polishing compound. What are they made of? |
|
|
|
Dan Robinson
From:
Colorado, USA
|
Posted 5 May 2020 5:23 pm
|
|
Plan was to clean up undercarriage parts, remove grease and oxidation. Won't be using a rubbing compound or abrasive. Other forum members have recommended the California Custom aluminum deoxidizer and purple polish for metal brightwork, like endplates. Might be great for knee levers and cross shafts too. But I'd feel better hearing from someone who had tried it.
I'm glad you mentioned the changer fingers. Wasn't originally planning to clean the changer. But it's oozing black greasy slime, and the intimidation factor has lost its grip on me. To NOT clean it now would be "I'm going to hate myself in the morning."
My guitar is a 2008 build that I got in 2016. It's been gently used. I don't care how the changer fingers look.
Just want to clean them and apply a PTFE lubricant that won't attract dirt. |
|
|
|
Gene Tani
From:
Pac NW
|
Posted 5 May 2020 6:05 pm
|
|
I was breaking 5ths at the changer so i smoothed over where that was happening with synthetic steel wool then i found the page that says not to do that.
Anyway firs try path of least resistance: 4 thousand q tips and see if the fingers move ok,
Otherwise, the cleaning without unbolting fromm cab is possible but Lane Grey says not recommended,
https://bb.steelguitarforum.com/viewtopic.php?t=259761
https://bb.steelguitarforum.com/viewtopic.php?t=335243
_________________
- keyless Sonny Jenkins laps stay in tune forever!; Carter PSG
- The secret sauce: polyester sweatpants to buff your picks, cheapo Presonus channel strip for preamp/EQ/compress/limiter, Diet Mountain Dew |
|
|
|
Dan Robinson
From:
Colorado, USA
|
Posted 5 May 2020 8:32 pm
|
|
Anyone have specific suggestions/cautions for servicing the Carter changer?
Gene, thanks, those are great references! James Morehead's guidance is THE WORD.
| James Morehead wrote: |
As Lane and a couple others mentioned--The only way to properly clean a changer is to disassemble it and clean it part by part. Anything less is just a band-aid on the problem. Be sure to take plenty of pics for re-assembly. 
Don't believe me? Go ahead and pour your favorite cleaner through until you believe it's clean, then tear it apart and you will see all the crud you missed, and that crud that is the deepest in your changer, is why you are messing with it anyways.
When you have the changer apart, you can now polish the moving parts for optimum performance from your changer. There are no "magic methods" or "quick-fix" to avoid the necessary work. But the rewards are great. |
Following James' advice with my round-front Sho-Bud, I removed and disassembled the changer. It wasn't as scary as I had anticipated. I didn't want to use a volatile solvent in the house. Believe it or not, the changer fingers cleaned up beautifully with Goo Gone. Planning to do the same this time.
There's two ways to do a job:
• fast
• half-fast (say it rapidly three times  ) ) |
|
|
|
Tucker Jackson
From:
Portland, Oregon, USA
|
Posted 6 May 2020 8:35 am
|
|
| Dan Robinson wrote: |
I don't care how the changer fingers look.
Just want to clean them and apply a PTFE lubricant that won't attract dirt. |
Polishing the changer fingers is not about how they look, it's done to remove the grooves that strings cut into them over time. If grooves get deep enough, the strings will start to 'zing' like a sitar. This usually first appears on the 4th string.
If you want to tear that changer down, go for it. Especially if, as you say, you're going to hate yourself in the morning in you don't tackle it. My theory is that if it's working fine, it ain't broke... just put some Tri-Flow on it and wait for it to tell you it needs attention. My attitude: Life is short. Wookshed! |
|
|
|
Dan Robinson
From:
Colorado, USA
|
Posted 6 May 2020 7:24 pm
|
|
Tucker, can't disagree with the value of time in the woodshed. I need the seat time for sure.
OTOH, the gunk leaking out between the changer fingers means there's more ugly deep inside. It isn't working as smoothly or with the precision it had in 2016 when I got it.
Removal, cleaning and re-lube of my Sho-Bud's changer made a big difference. I didn't polish the fingers. I hope the Carter changer parts are in good condition. If so, I will leave them alone. At least the grit, all of it, will be gone, the changer and axle will have new, clean lubricant.
If fingers have grooves, burrs, or don't move freely I can folllow James' recommendation for "optimum performance." |
|
|
|
Tucker Jackson
From:
Portland, Oregon, USA
|
Posted 7 May 2020 8:55 am
|
|
| Cool. After you have finished removing and cleaning up that changer, please report back if you run into any trouble. I'll probably be having to do mine at some point down the line... |
|
|
|
Dan Robinson
From:
Colorado, USA
|
Posted 7 May 2020 2:44 pm Look Ma, no rods!
|
|
 |
|
|
|
Dan Robinson
From:
Colorado, USA
|
Posted 7 May 2020 2:54 pm
|
|
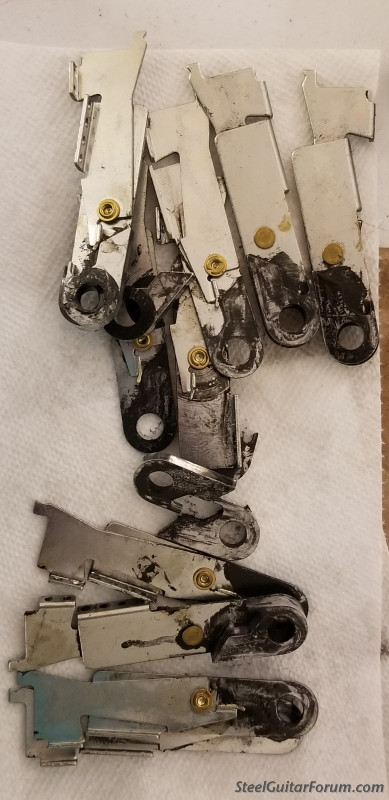
Before and after pics of a few parts after a little TLC.


 |
|
|
|
Dan Robinson
From:
Colorado, USA
|
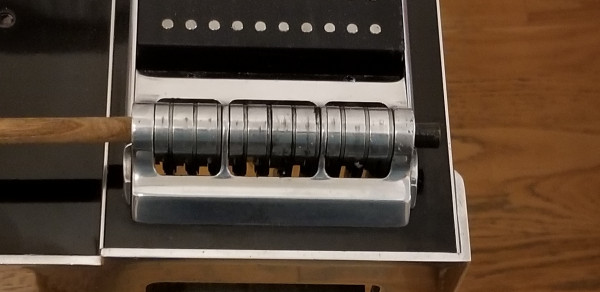
Posted 8 May 2020 7:09 pm The Inside Story
|
|
Whadda ya think?
 |
|
|
|
Tucker Jackson
From:
Portland, Oregon, USA
|
Posted 9 May 2020 9:33 am Re: The Inside Story
|
|
| Dan Robinson wrote: |
Whadda ya think?
|
I think somebody needs to take their changer apart and clean it up.  |
|
|
|
Dan Robinson
From:
Colorado, USA
|
Posted 9 May 2020 2:26 pm Re: The Inside Story
|
|
| Tucker Jackson wrote: |
| Dan Robinson wrote: |
Whadda ya think?
|
I think somebody needs to take their changer apart and clean it up. |
I was thinking the same thing
Removing "the works" is pretty straightforward. Disconnect the lower return springs, then drive the axle out with a wooden dowel and leather mallet. Withdraw the dowel slowly, and catch the changer parts as they drop out.
There was one "gotcha" I hadn't expected. The changer housing is separated into 3 blocks. The fingers are grouped into 3 sets of three, four, and three fingers. There's a small bushing on both sides of each set, 6 total. Some of them came out with the changer finger, but a few stayed behind, stuck in the axle grease. They were hard to see, could have been broken or lost.
The axle need to be smoothed and polished. I'm not sure what is the best way to do that. Suggestions?
 |
|
|
|