| Author |
Topic: Design and build of a Franklin style 12 string. |
Don McKinley
From:
California, USA
|
 Posted 30 Apr 2021 12:00 pm
 |
|
Jim,
I agree on the sum total view of the playability. I think that those who have the good fortune to have a coherent elasticity spread uniformly throughout their instruments will probably have the best playing most responsive instruments. That would be difficult to plan for though, I would think. I like the saw analogy
I think you are probably right with the roller nut hysteresis thing. I'm using a hardened 1/8 axle. It would be intersting after I'm rolling to compare it to a 1/16 axle. 1/8" spacers would be easy to make. I think I probably may do better with chrome plating for an even slipperier surface. Some of the surface treatments they put on carbide cutters are very slippery. I've not seen just coated rounds. They may be available though. I'll save that for later for small improvements just for kicks.
Thinking about it just now, it strikes me that if the nut were to lie on a node point, you may have greater hysteresis than if the nut were on a point of maximum vibration. If you have table salt sprinkled on an inclined plane that's not too slanted it will just sit there. If you then put a little ultrasonic or other vibration on the plane, the salt will just slip down the inclined plane as if the friction were not there. I guess you could test the idea by just putting a little ultrasonic on the nut and see if anything changes. Just for curiosity though. I wouldn't expect to change much based on that.
Paddy,
I may have some spares after the project is done that I could part with. My process was troublesome though because it seems like no matter how many tools you have, you always need a new one to make the work go accurately with speed. I did it the slow way due to not wanting to spend money on tools that I would only use once. I can envision making em in almost one or two passes, but that would require better cutters and a little saw. I think some effective surface conditioning like a tumbler with the proper media would be a nice addition to make em look a little more like downtown. I notice that some pics of other bellcranks look like they were conditioned with a nice process. I turned the edges over by hand in the ones I made. They look OK but I think a more mechanized process would make em look a bit better.
Jack
Interesting that you remember about the machined changer finger holes. I machined mine a thousanth or so small and then lapped them on the lathe with a close fitting dowel wrapped with fine silicone carbide paper until just right, same with the raise/lower levers. Probably overkill but they're done now and they fit slicker than a greased weasel.
Jack and JD
You are both absolutely correct about the cast aluminum parts vs machined. I would have loved to have been able to get a foundry to cast me up some parts. I even talked to a foundry that would have done it at reasonable cost. However making the model and the running arround, making sure the alloy was right, training the foundry staff on my specs, the risk of the learning curve, and all the other time issues and cost just made me decide on machining. I agree though, cast is no doubt better. It's less damping.
I had an interesting experience. I mistakenly turned the spindle backwards when drilling a 5/16 hole in T6 Aluminum which is the alloy for the end plates. The drill went halfway through backwards before I could catch it and stop the process. When I manually filed the defect off the piece to clean it up and continue on past the error, the metal was unbelievablebly more rigid. From that I deduce that the original T6 temper would have substancially more damping than in the unhardened condition.
I think you're right. I'm most probably taking a hit on the response and playability because of the machined vs cast pieces. I would be tickled to death to get anywhere near the Franklin experience. That may have to wait just a little bit longer though.
Bobby
Excellent suggestion about the plastic and decorations. I'm thinking that I'll do that or something similar. I think I'll probably just use wood. I like your pic. Excellent project I know what you went through. I'm having a blast. Do you have a post mentioning this project and more of the details that you can post here? I'd be interested in the features that you built into your PSG. I have a dynosaur CNC. I can imagine that manual milling would be a bit more time consuming. However it's possible to waste a lot of programming time on one off milling projects. I'm not sure which is faster now that I think about it. This is the largest metal machining project that I've done so my experience with machining isn't that extensive. I learned quite a bit.
Hi Sonny
I have 30 years violin/related instruments repair experience, 10 years exclusive violin making, 2 or 3 years pattern making to assist a blow mold shop, lots of reading in physics and a bit of math, always played piano and violin throughout improving very slowly to what I would say is about an upper intermediate level presently. If the good Lord tarries and I don't finally kick the bucket too awfully soon, I may have just barely scraped the lowest level of advanced. By then of course, I'll be about 110. I'll never be great, I don't have the talent for it but I enjoy it. I played dobro in a bluegrass band for about 5-6 years with the last gig about 6 years ago. The machining came sideways through the violin making experience making jigs fixtures etc. The best word describing me I think was the last one you employed... "savant". My wife says "idiot" savant. Although if you leave off the savant part it would come closer to the truth. Just kidding. My wife is teriffic. She encourgaged me in the pedal steel project and is enthusiastic about all my activities.
Regards DM |
|
|
|
Marty Broussard
From:
Broussard, Louisiana, USA
|
Posted 30 Apr 2021 3:43 pm
|
|
Wow, the patience that it takes to do what you’re doing is impressive.
_________________
RETIRED
"Technique is really the elimination of the unnecessary..it is a constant effort to avoid any personal impediment or obstacle to achieve the smooth flow of energy and intent" Yehudi Menuhin
Last edited by Marty Broussard on 30 Apr 2021 8:05 pm; edited 1 time in total |
|
|
|
Bobby D. Jones
From:
West Virginia, USA
|
Posted 30 Apr 2021 7:09 pm
|
|
Don when I started building that steel about 1970 there was a guy local that had made a set of masters for Left and Right End Plates, Key Head, Pedal Bar, Pedals and Changer Pickup Frame. A small custom foundry made them. (Long Gone) The changer frame was flimsy. I cast the Changer Pickup frames out of junk auto transmission case aluminum. That was a project itself. Took them to work in my lunch box, A friend milled them in the machine shop.
The front and rear apron have .250 Aluminum bars bolted to the end plates and Bronze bushings for cross rods. Been thinking about revisiting that project and updating some things. |
|
|
|
Don McKinley
From:
California, USA
|
Posted 30 Apr 2021 11:05 pm
|
|
Bobby,
I think your project probably took more determination than mine. You did both necks and had to scrounge materials. The resources for collecting information, gathering supplies, machining them, and so many other things were much more difficult and expensive back then. I'm sure it was very satisfying to finally get it strung up. How long did your whole project take?
In 1973 in high school I got a job at Benji's Deli washing dishes to finance purchase of a new Gibson Mastertone banjo. I bought it from a very nice old man who was a music wholesaler and had a lot of connections. I still have the banjo. I really liked the Granada inlay pattern which if I had purchased it with that pattern from the factory would surely have made the cost out of reach for me. I made my own replacement neck with the pattern that I wanted and still play it that way today. That was my first useable music project.
In 1973, a pedal steel project would not have been possible for me to make. I wouldn't have been able to afford to buy a nice one either. 550 bucks was a ton of money back then which is close to what I paid for the banjo. It was standard model RB-250. |
|
|
|
Ross Shafer
From:
Petaluma, California
|
Posted 1 May 2021 11:30 am
|
|
Whoa now....I worked at Benji's (Santa Ana) in '71 ish. A pal who worked there with me got a bro-buddy deal on a Sunn amp through the same (?) old gent, who ate breakfast at the counter.....we talkin' the same place?
OK, sorry for the hi-jack.....back to our original subject. You're doing a great job on your steel! |
|
|
|
Mitch Ellis
From:
Collins, Mississippi USA
|
Posted 1 May 2021 8:27 pm
|
|
| Jack Stoner wrote: |
| I don't think it will sound like a Franklin. |
It may sound better. Who knows? You're doing an amazing job. Please keep the updates and pictures coming. Like others, I enjoy seeing your progress. I made a coffee cup holder out of an old horseshoe and thought that I had really done something.  There's no way I could tackle a job like what you're doing. Like Jim said, you're a smart cookie. It all looks great. There's no way I could tackle a job like what you're doing. Like Jim said, you're a smart cookie. It all looks great.
Mitch |
|
|
|
Don McKinley
From:
California, USA
|
Posted 1 May 2021 10:46 pm
|
|
Hi Ross,
Yep, we're definitely talkin' bout the same place. That's real interesting. It was probably the same old gent. I'm pretty sure I was working there at a later time than you. Working at Benji's was a good experience for me. I don't remember how long I worked there, but it wasn't longer than a year. Did you know Jim Keppin? Spelling may not be correct. He played guitar and was my connection with Benji's as well as the old guy as he worked there before me. I don't remember the old guy's name, might have been Mr. Simon.
If you went to Foothill High School I may have run into you there but you would probably more likely know my older brother Mark if you did go there as he knows quite a few more people than me judging by the year you were at Benji's are probably closer to his age. Now that I think about it I don't think I worked there longer than about 4 months. Got a job at Stater Bros down the street.
Hi Mitch,
I like the coffee cup holder. Would it hold a beer and did you attach it to your pedal steel. I always tell people that the reason I like the pedal steel so much is that it is tacky and it is also the only musical instrument that comes from the factory with a built in place for a beer and a cigarrette. I respect beer and I respect cigarrettes -- even though I don't smoke and I don't drink. (unless it's an official competition and then I always lose) In fact, that reminds me of a story....oh never mind.
DM |
|
|
|
J D Sauser
From:
Wellington, Florida
|
Posted 2 May 2021 10:10 am Franklins are really easy to work on
|
|
Just finished installing new fret boards on a friend's Franklin.
They are really easy to work on! Went on real good.

I am sure he will be thrilled!... J-D.

_________________
__________________________________________________________
Was it JFK who said: Ask Not What TAB Can Do For You - Rather Ask Yourself "What Would B.B. King Do?"
A Little Mental Health Warning:
Tablature KILLS SKILLS.
The uses of Tablature is addictive and has been linked to reduced musical fertility.
Those who produce Tablature did never use it.
I say it humorously, but I mean it. |
|
|
|
Dale Rivard
From:
Ontario, Canada
|
Posted 2 May 2021 1:55 pm
|
|
| J D, I wouldn't recommend putting the fretboards on that way but it would make playing in "Hugheyland" much easier. Lol |
|
|
|
Paddy Long
From:
Christchurch, New Zealand
|
Posted 2 May 2021 2:35 pm
|
|
Thanks Don, I would be keen on any spare bell cranks you may have left over at the end of your project :-}
_________________
14'Zumsteel Hybrid D10 9+9
08'Zumsteel Hybrid D10 9+9
94' Franklin Stereo D10 9+8
Telonics, Peterson, Steelers Choice, Benado, Lexicon, Red Dirt Cases. |
|
|
|
Don McKinley
From:
California, USA
|
Posted 3 May 2021 5:26 pm
|
|
JD:
That's for left handed players, right?
That's almost as good as me yesterday. I was spraying the cabinet with lacquer. I thought the screws were a little non-snug when i screwed it to the holding fixture but ignored it cause I really wanted to get on with it. Took it outside, I was turning it over on the fixture to spray the other side, and..."plop sprivvit mpuffshh pfff"...it dropped right off and went straight into the dirt. I just shook my head.
Thank goodness that stuff drys so fast. I got to work with the compressed air and got most of the stuff off without too much damage and without even blowing waves in the lacquer. There's a little laquer repair but I don't think it'll even be visible at all when done. |
|
|
|
Don McKinley
From:
California, USA
|
Posted 7 May 2021 2:11 pm
|
|
When thinking about efficiency of sound production and response in the pedal steel and other stringed instruments, there is an analogy in the energy efficiency of battery operated devices.
The maximum efficiency of energy usage for a battery operated device is when the internal impedance of the device matches the internal impedance of the battery. Excess heat is generated that does not add to the function of the device when these two do not match.
With regard to a pedal steel guitar or a violin or a piano or any other stringed instrument, if there is a mismatch in the stiffness of the major load bearing elements as assembled, or a stiffness discontinuity in attaching them together, I would imagine that would be equated to less energy available to be returned to the structure of the instrument to perpetuate the vibration. This is probably just sustain.
Assuming that the stiffness values all work together as above, it could be that response is a separate issue. I would imagine that response may be sensitive to where on the scale of stiffness does the instrument lie. Too stiff and the wood does not absorb enough energy to convert into sound, too loose and all the energy goes into damping.
Now that's easy to say but verifying or disproving that and then converting it into a superior instrument may be tougher than just making the things in the first place and making improvements here and there that seem to be right.
Just some thoughts, probably covered in other posts. |
|
|
|
Don McKinley
From:
California, USA
|
Posted 25 May 2021 12:49 pm
|
|
Now that I have finished all of my parts I am putting together the steel. The end plates are on temporarily so that I can make the edges meet correctly. It shouldn't be too long till I can play it. Now I'm prepping for the finish process. I don't like varnishing and varnishing doesn't like me. But here goes.
 |
|
|
|
Don McKinley
From:
California, USA
|
Posted 25 May 2021 1:31 pm
|
|
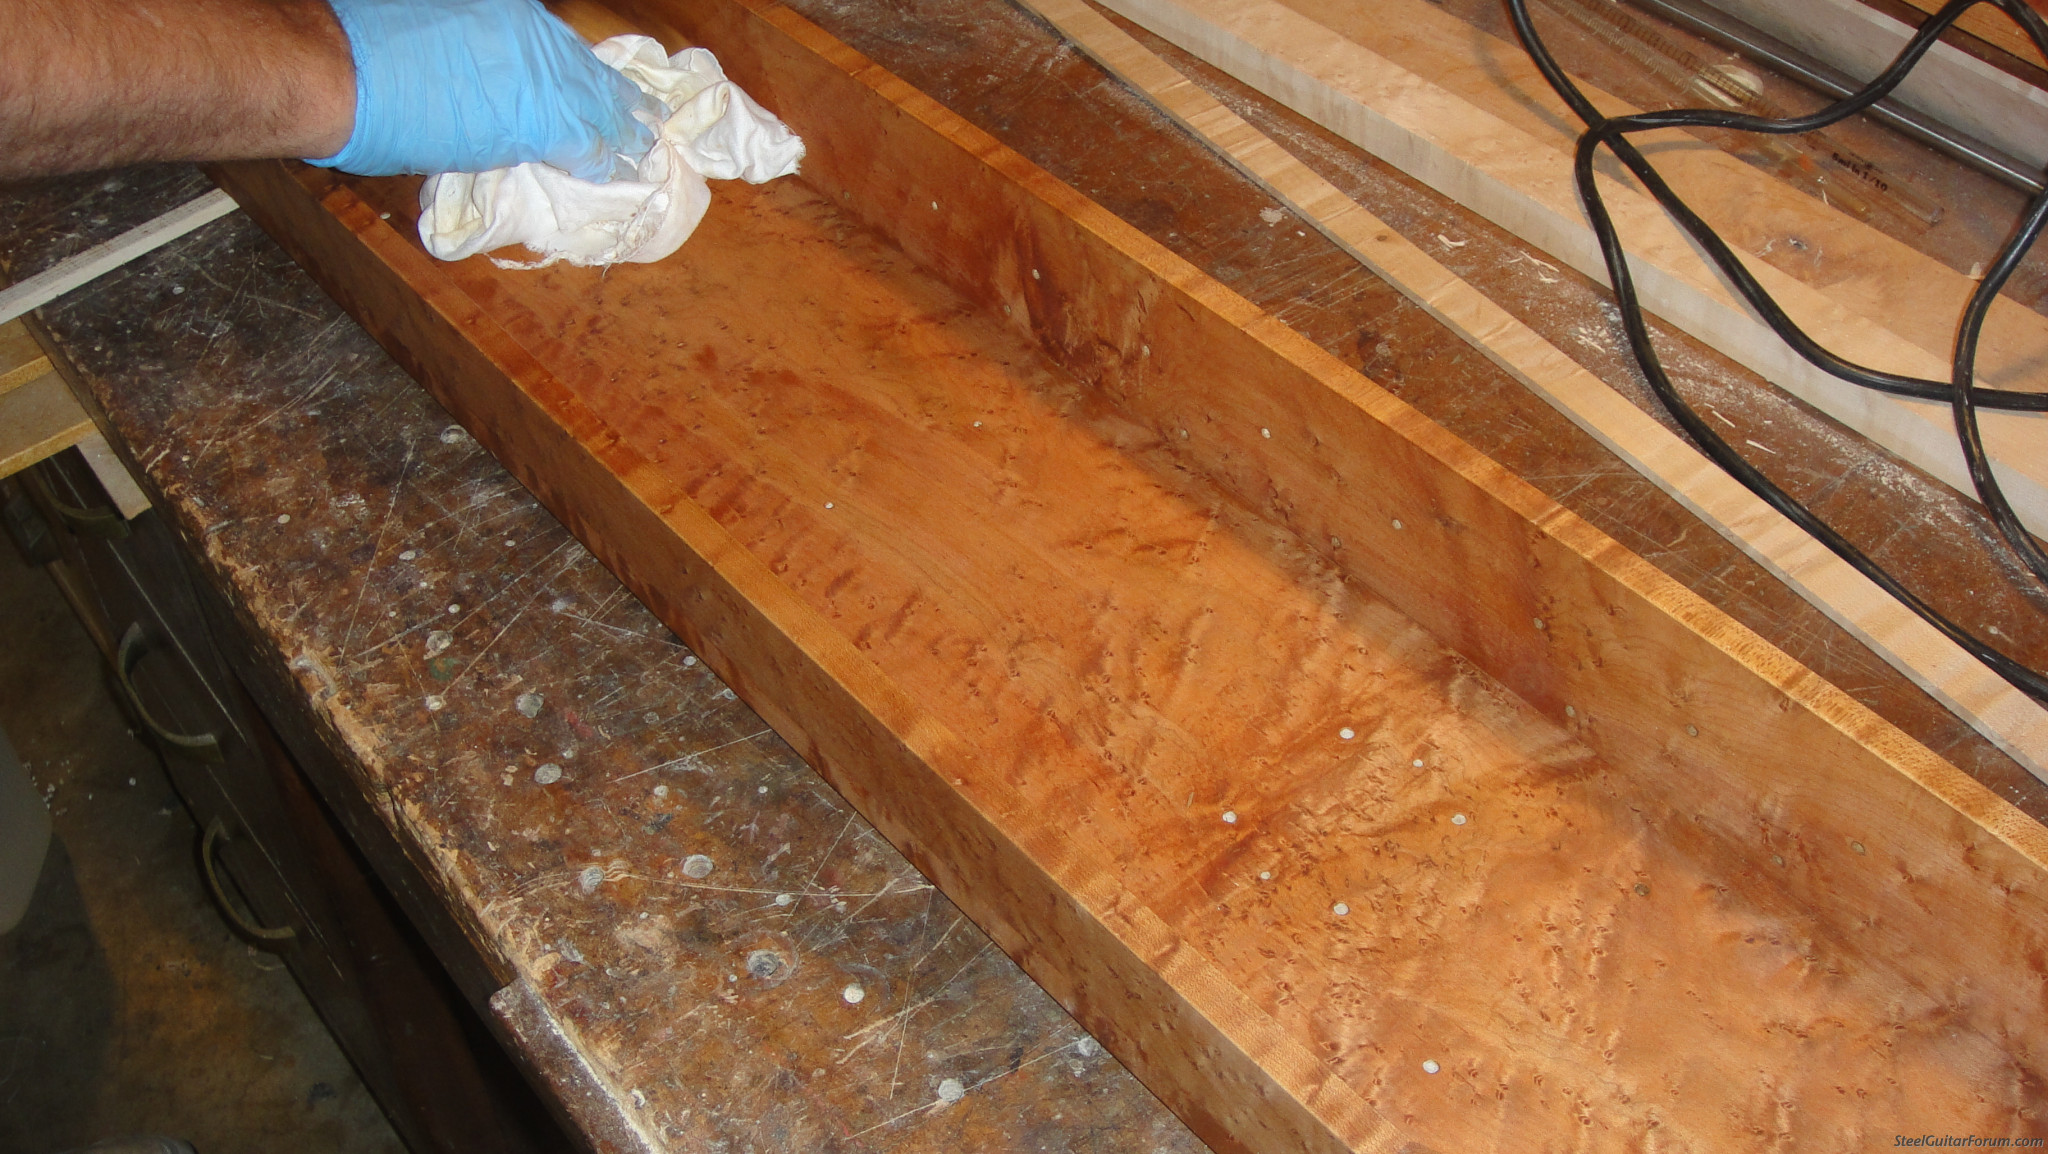
Here's the first coat of finish. I like the look of oil in the wood, but it kinda kills the liveliness so I am going to destroy this piece by starting with 90% rosin and 10% linseed oil with a touch of cobalt drier mixed in. I like the way that oil makes the wood look richer and then improve with time, but I also like the liveliness of resin in the wood so I put the two together in the wood in a wipe and then later put lacquer over the top. I also started the aging discoloration off with a little 2% sulfuric acid on the wood followed by 2% sodium nitrite. That liberates the NO2 and gives a real nice look to the wood.
Sulfuric acid in some form or another is the thing that makes old pulp books turn the color of kraft paper and disintegrate. That won't happen all the way through the wood though and because of the mildness of the treatment isn't a problem at all. What's it going to do,, collapse? I don't think so. As the surface deteriorates I think it looks better and better in general. There has been a fad in finishing for the last 20-30 years that people don't want their finishing processes to yellow. That may be good on some things, but the yellow is what adds richness. Colors without yellow are cold and sterile. Sometimes you want cold and sterile, but not on wooden musical instruments.
 |
|
|
|
Don McKinley
From:
California, USA
|
Posted 25 May 2021 1:48 pm
|
|
Here it is with a few coats of lacquer before buffing and, oh yea, after turning over the edges on the aluminum and buffing that. I didn't bring the aluminum up to class A mirror surface finish because I'm just too lazy and don't quite have the proper equipment to do the job right. And besides that its DANGEROUS. I caught the parts on the wheel and tossed both the peghead and the entire neck across the shop once each. I'm lucky that I didn't commit harikari or chop off a finger or two.
I was originally going to use polyurethane for the finish, but after I started I could see that it didn't go on correctly and so I washed it back off and after it was dry, clean, prepped and ready to continue, I sprayed with nitrocellulose from Rockler.
You can see the wide key at the peghead end for indexing the neck onto the top. The recess at the changer end is to provide a definite stop for the changer. These two things are probably overkill, but what the hey. In keeping with this idea, I probably should have anchored the changer and the peghead on the outboard side to spread the tension over a larger surface. I wonder if it might make a little better response to the instrument. I guess I'll never know because I don't plan to make any other pedal steels.
 |
|
|
|
Don McKinley
From:
California, USA
|
Posted 25 May 2021 1:51 pm
|
|
A little smooth and polish on the peghead.
 |
|
|
|
Jim Palenscar
From:
Oceanside, Calif, USA
|
Posted 25 May 2021 1:59 pm
|
|
| Go Don- go! |
|
|
|
Don McKinley
From:
California, USA
|
Posted 25 May 2021 2:07 pm
|
|
Making a fingerboard. I decided to co-opt this banjo fingerboard pattern. I cut the pattern in maple then filled with black and sanded down. I lacquered the fingerboard before machining so that I wouldn't stain the maple with the fill color. It still darkened down somewhat. I was becoming a little impatient for the process to move along and so rushed the process somewhat and consequently the color doesn't quite match in the finished product, but still looks fairly decent.
The fingerboard is attached with two screws camouflaged in a couple of the black places. I'm disappointed that there is a little tear out at the very end closest to the changer. I would have filled it and then rerouted the area, but I'm just too impatient. I can make another fingerboard at any time and install it if I want to (I won't want to).
 |
|
|
|
Don McKinley
From:
California, USA
|
Posted 25 May 2021 2:11 pm
|
|
Oh yea, starting to take shape now. No underneath parts are installed yet.
 |
|
|
|
Don McKinley
From:
California, USA
|
Posted 25 May 2021 2:15 pm
|
|
I noticed a couple of the changers were a little sticky and so I took it apart and loosened them up a little. The rivets were juust a little snug. I loosened them up by tapping on the formed recess and thereby pushing the rivet into a hole in a temporary anvil that I had drilled into a piece of aluminum.
 |
|
|
|
Ross Shafer
From:
Petaluma, California
|
Posted 26 May 2021 6:43 am
|
|
| lookin' Good Don! |
|
|
|
Stu Schulman
From:
Ulster Park New Yawk (deceased)
|
Posted 26 May 2021 8:07 am
|
|
Don,from one dishwasher to another,You are amazing!
_________________
Steeltronics Z-pickup,Desert Rose S-10 4+5,Desert Rose Keyless S-10 3+5... Mullen G2 S-10 3+5,Telonics 206 pickups,Telonics volume pedal.,Blanton SD -10,Emmons GS_10...Zirctone bar,Bill Groner Bar...any amp that isn't broken.Steel Seat.Com seats...Licking paint chips off of Chinese Toys since 1952. |
|
|
|
Don McKinley
From:
California, USA
|
Posted 26 May 2021 9:47 pm
|
|
Finally putting the business together. This is not without it's problems. I have noticed several little items that I wish I had done differently. I neglected to drill several holes that would have been much easier to include in the programming. I just overlooked them they were in the cad model but not included in the programming for the machine. It just takes a little longer. I'm not quite sure about making the rods the right length so that they sit at exactly the optimal spot. I have plenty of aluminum rod material, but I really don't want to be threading any more rods. I'm ready to be done with this project. I want to play. I'll screw on the nylon tuning nuts leaving about 1/8 inch of threads exposed for tuning and then try to pin the rods so that the pull just splits the movement evenly over top dead center. I hope that's right.
There's several problems with the knee levers. I may need to cut and replace a few incorrectly drilled end pieces or possibly just shorten them an inch or so. I think they're long enough. That's a pretty minor thing though. I'm not sure yet, but I think that the square bottom on one of the levers was a travel stop and I improperly rounded it. If so, I'll either replace it or add a separate screwed in back stop. I know I'll find more things that I need to correct.
When installing the cross shafts I was twiddling around trying to align the bell cranks with the changer finger holes and finally realized it would go much faster with a template to assist. I tried that but it only helped a little so I chucked that. I then machined a quick little fixture in a piece of pine to receive the bell cranks to put them in exact alignment first time. It looks a little raggedy but it is very precise. The bell cranks snap right down into the fixture in exactly the right spot. I clamped on a stop to complete the fixture because it was faster than trying to machine it along with the other simple details.
Any suggestions that may help to speed the process or avoid common errors would be most definitely be appreciated.
 |
|
|
|
Don McKinley
From:
California, USA
|
Posted 26 May 2021 10:23 pm
|
|
Just got the cross shafts on for a first fit. I'm almost ready to start with the pull rods. I also may have ordered the pedal rods a little long. I may have to re-bend the ends or exchange them. I also have to finish off and polish the pedal rail and attach the pedals and drill the pedals for the rod attachments. This model has a single axle for the pedals with some spacers to keep proper spacing. I'll have five pedals on this one.
I'm thinking about putting a curly maple facing on the pedal rail to match the body but I may just leave it polished aluminum. If I do put a facing on it, I may engrave it with some train oriented patterns in keeping with the ridiculous name logo that I chose for the body. I saw a long 8" x 3/4" incredible piece of slab cut curly maple for $8 a BF at Home Depot in the stack and almost fainted. I would have bought it but I don't intend to make any more stuff that would need it. Whoever was responsible for sawing up that log lost his employer hundreds and hundreds of dollars maybe thousands. If the whole log looked like that one board it would have gone for maybe 5 times that amount sawed correctly
I like the nice little bend on the low end that Mike Johnson put on the intro to Rhonda Vincent's "When the grass grows over me" so I'll make sure to add that to whatever pedal or knee lever would be most appropriate. I'm sure I'll never play as well as Mike, but I'll definitely enjoy trying.
 |
|
|
|
Don McKinley
From:
California, USA
|
Posted 19 Jun 2021 7:10 pm
|
|

OK, I'll call it done after a few more pics although I'll still have a bunch of adjustments to make. Here is rodding the instrument. I mark the rod where I want the pin then put the rod in the drill fixture till the mark shows in the little hole, tighten the stop on the rod to have a positive stop and then drill.
 |
|
|
|