| Author |
Topic: ZB D-11 Clean-up |
Eric Dahlhoff
From:
Point Arena, California
|
 Posted 13 Feb 2019 8:12 am
 |
|
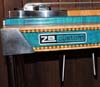
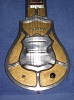
I acquired a ZB Custom D-11 a few months ago for a clean-up project. The body had been refinished at some point and looks very nice, but the mechanics were in need of cleaning, adjustment and repair. I am finally getting time to work on it and thought I'd share a few pictures.
It's quite gorgeous and worth the effort I think...

Most of the linkage is out of adjustment, no doubt because it has the old style round stand-offs instead of the later hex turnbuckles.  I will replace all of them with turnbuckles when I get to that point. I will replace all of them with turnbuckles when I get to that point.

The last person to work on it used wheel bearing grease to assemble it.


That was a mighty mess to get rid of. 
I reassembled using stainless fender washers behind the pedal pull levers. I have found that this keeps the levers away from the mounting plate better than the stock tiny washers.

The #11 finger on the C6 neck had a busted tuner end.

These are usually attached with silver solder. Someone had brazed most (not all  ) of them. It was too hard to remove, so I was able to fashion a brass stand-off of the right size. ) of them. It was too hard to remove, so I was able to fashion a brass stand-off of the right size.

The fingers were dirty but at least there was no wheel bearing grease! 

I recently bought a small ultrasonic cleaner. Makes cleaning parts ever-so-much easier! 
Installing fingers...


That's it for now. I'll post more pics as I progress. Feel free to ask any questions and/or offer advice.  [/b] [/b]
_________________
"To live outside the law you must be honest." (Bob Dylan) |
|
|
|
Russ Tkac
|
Posted 13 Feb 2019 3:51 pm
|
|
| Very nice Eric. Great to see this one going through the process of a nice detailing. |
|
|
|
Richard Sinkler
From:
aka: Rusty Strings -- Missoula, Montana
|
Posted 14 Feb 2019 6:40 am
|
|
WOW!!!!!! I'm getting all tingly. 😱🤩
_________________
Carter D10 8p/8k, Dekley S10 3p/4k C6 setup,Regal RD40 Dobro, NV400, NV112 . Playing for 54 years and still counting. |
|
|
|
J R Rose
From:
Keota, Oklahoma, USA
|
Posted 15 Feb 2019 7:20 am
|
|
Very, very nice Eric, Beautiful Guitar. I had brought a 1968 D-11 last year to do the same to but gave up before I even started. Just too big a job for an old man so I sold it. Regret that now but their comes a time you just have to face it that you are old and cannot do what you once did. J.R.
_________________
NOTHING..Sold it all. J.R. Rose |
|
|
|
Eric Dahlhoff
From:
Point Arena, California
|
Posted 15 Feb 2019 8:16 am working on ZBs
|
|
Thanks for the encouragement guys.
I used to like fixing up old cars, but it's much more satisfying to bring an old musical instrument back to life. And my wife really appreciates how much smaller they are than vehicles
Although this ZB does weigh nearly as much as my old truck 
As I post some more pics I hope it might help someone else in giving a 40-50 year old ZB another life.
_________________
"To live outside the law you must be honest." (Bob Dylan) |
|
|
|
Erv Niehaus
From:
Litchfield, MN, USA
|
Posted 15 Feb 2019 8:19 am
|
|
You think that was a job, look at what I did to this one:
 |
|
|
|
Eric Dahlhoff
From:
Point Arena, California
|
Posted 15 Feb 2019 9:31 am
|
|
You betcha Erv, your ZB project is one of ones that inspired me!
_________________
"To live outside the law you must be honest." (Bob Dylan) |
|
|
|
Dave Zirbel
From:
Sebastopol, CA USA
|
Posted 15 Feb 2019 9:32 am
|
|
Nice work Eric!
Dave Z
_________________
Dave Zirbel-
Sierra S-10 (Built by Ross Shafer),ZB, Fender 400 guitars, various tube and SS amps |
|
|
|
Russ Tkac
|
Posted 15 Feb 2019 10:07 am
|
|
| Beautiful work Erv. |
|
|
|
Erv Niehaus
From:
Litchfield, MN, USA
|
Posted 15 Feb 2019 10:13 am
|
|
Russ,
Thank you!
It certainly was a challenge!
I tried to save all the components that I felt contributed to the ZB sound, namely the changers and the pickups.
The changer very closely resembles the Emmons p/p changer and I felt that was important to retain along with the ZB pickup. I fabricated a lot of the undercarriage and the rest was procured from Al Brisco in Canada.
I also refinished the cabinet.
Erv |
|
|
|
Steve Sycamore
From:
Sweden
|
Posted 15 Feb 2019 2:31 pm
|
|
Very nice! Would you have any recommendations on how to buy a good ultrasonic cleaning unit?
My refinished guitar could almost be a twin. But its underside lacks the clean beauty of either of yours.
 |
|
|
|
Eric Dahlhoff
From:
Point Arena, California
|
|
|
|
Eric Dahlhoff
From:
Point Arena, California
|
Posted 17 Feb 2019 8:47 am pickup problem
|
|
So... I strung up both necks and tuned the changes at the end plate (no pull rods installed yet). I played it for a while and noticed that the front neck was way quieter that the back 
Turns out that this 50 year old ZB has the front pickup mounted off center
Take the strings off; remove the pup; fill the holes; drill new holes; remount the pup; strings back on!

_________________
"To live outside the law you must be honest." (Bob Dylan) |
|
|
|
Michael Greer
From:
Ontario, Canada
|
Posted 17 Feb 2019 12:03 pm
|
|
Eric
Thanks so much for posting your cleanup / repair pictures..guitar is looking great
Mike |
|
|
|
Matt Sutton
From:
New York, USA
|
Posted 17 Feb 2019 1:30 pm
|
|
thanks for posting this- I'm getting ready to re-rod my C6 neck and your work is inspiring.
A question about those standoffs instead of turnbuckles: Did all the early builds have those? Mine is #1008 and had the standoffs when I got it. It was a mess, and I figured that someone had re-rodded it badly. I needed to change from Day to Emmons anyway and ended up building turnbuckles for the E9 neck- I couldn't figure out how anyone could get it adjusted properly using the standoffs.
BTW, the C6 still has the standoffs, though in a much simplified copedant.
Matt |
|
|
|
Eric Dahlhoff
From:
Point Arena, California
|
Posted 17 Feb 2019 2:41 pm turnbuckles
|
|
Michael & Matt, thanks!
Matt - my understanding is that Zane Beck started serial numbers at 1000, so yours is #8 that he made. I don't know when the change was made to turnbuckles.
Here's a couple pics of turnbuckles vs stand-offs.
I guess it takes LOTS of patience to adjust pulls using the stand-offs.
I made a batch of turnbuckles for this project. Tedious but well worth it!

I highly recommend replacing the 6-40 nuts with larger wrench size (still 6-40) so that it is easier to get your wrenches on the nut and turnbuckle.

_________________
"To live outside the law you must be honest." (Bob Dylan) |
|
|
|
James Flaherty
From:
California, USA
|
Posted 17 Feb 2019 10:22 pm
|
|
| What's a "round stand off?" Thanks. |
|
|
|
Eric Dahlhoff
From:
Point Arena, California
|
Posted 18 Feb 2019 8:55 am turnbuckles
|
|
In the picture above; the round ones have right-hand threads on both ends. Hence the only way to adjust them is to disconnect the rod and turn the stand-off (which is round, and hard to grip) and then reconnect the rod.
Since balancing the pulls requires lots of little adjustments, having to disconnect the rod for each tiny turn is very cumbersome.
As compared to a hex turnbuckle, which has left-hand & right-hand threads, allowing you to use a wrench and simply turn it to balance the pulls.
_________________
"To live outside the law you must be honest." (Bob Dylan) |
|
|
|
Erv Niehaus
From:
Litchfield, MN, USA
|
Posted 18 Feb 2019 9:13 am
|
|
And the end that hooks onto the changer fingers is made from bicycle spokes. 
Erv |
|
|
|
Eric Dahlhoff
From:
Point Arena, California
|
Posted 23 Feb 2019 9:05 am P1-3 Setup
|
|
Here's how I go about setting up the first 3 pedals.
Start with P1. Balance the pulls using the turnbuckles at the changer end. The goal is for the adjusting screws at the end-plate to bottom out at the same time. (The tuning of the raise should already be adjusted).
-If a string is slow to raise, speed it up by tightening it's turnbuckle & loosen the other one.
-Also speed it up by moving the pull rod closer to the yoke center.
-The P1 yoke should be mounted in the bottom hole closest to the pivot.
-The P2 yoke can be mounted in the bottom or 2nd hole, depending on travel & feel.
-The P3 yoke definitely needs to be mounted in the next higher hole.
(Think of these flat bars as bell cranks in a "normal" PSG: farther from the pivot point is faster/harder)
Assuming Emmons setup, the first 3 pedals should look like this.

Once all 3 are set and adjusted, and the rods fit between each other with no problems... carefully take it all apart and mount them underneath
Make sure that the mounting screw for the yoke allows enough clearance for the rods. You'll want to put a touch of lube on the yoke before you assemble it.

_________________
"To live outside the law you must be honest." (Bob Dylan) |
|
|
|