| Author |
Topic: Another DIY Lap Steel |
David Feller
From:
United Kingdom
|
 Posted 3 Mar 2016 2:45 pm
 |
|
I started playing the lap steel about six months ago and really enjoy it. I'm not very good, but I have always loved the sound and after reading so many threads on the topic, I thought I would build a steel of my own. I have found the Artisan beginner's steel to be alright for basic learning, but not very melodic, and also I was thinking that building a steel would help me understand how they actually make sound, and thus how I could make the right sound.
With so many builds to look at, I started out looking for wood; I wanted something 50mm deep, and after checking out various woods for density, I ended up with the economical mahogany solution.

Once I had the wood [1metre long, 250mm wide, 50mm thick] , I started thinking about a design. |
|
|
|
David Feller
From:
United Kingdom
|
Posted 3 Mar 2016 2:49 pm
|
|
I really like the looks of the Gibson Ultratone, and the newer Duesenberg Pomona, and after looking at all sorts of things for inspiration (Frank Lloyd Wright windows, etc.), I woke up one morning and sketched this up in about 5 minutes. I must have figured it out in my sleep. It wasn't in proportion so much as it was the right shape and I wanted some detailing to it. I also wanted the tuning keys inline like a Telecaster so the keys were easier for me to tune, and I wanted a big scale so I would have a little more room to play. The Artisan has been difficult in that regard. I saw the Duesys use a 25.5 inch scale so that was what I decided on, too.
 |
|
|
|
Joe Elk
From:
Ohio, USA
|
Posted 3 Mar 2016 5:58 pm
|
|
I have build 4 lap steels I like a 24 inch. I like you concept sketch!!!!
Since You are From UK, I would get in touch James Kerr Nice feller, plays very
well and has build a number of steel guitars. He is a member of the Forum and has a lot of stuff on Utube.
Joe Elk |
|
|
|
Keith Glendinning
From:
United Kingdom
|
Posted 3 Mar 2016 6:24 pm
|
|
Hi David.
I've built 3 Lap Steels so far. 2 six stringers with 22 1/2" and one 8 stringer with a 25" scale. Apart from liking the additional notes available on the 8 string, the 25" scale also gives it much better sustain.
My main tuning is C6, but I also use A6 and B11.
Keith. |
|
|
|
David Feller
From:
United Kingdom
|
Posted 5 Mar 2016 2:03 am
|
|
Thanks, Keith and Joe! I'll look up Mr. Kerr for additional advice.
The shaping has been coming along. I can see how the whole thing would go much faster had I a band saw, a disc sander, etc. OTOH, with just the router and the weird oscillating tool, I have to move slowly so maybe that's better. Actually, the router is not a slow and easy beast to use and I've been happy to learn about its terrible powers on several practice chunks before getting into the actual guitar base!
More pictures to come. |
|
|
|
David Feller
From:
United Kingdom
|
Posted 5 Mar 2016 2:04 am
|
|
| BTW, my 'student' steel is tuned in C6, and I'm thinking about putting the new one in another key. C6 works well with most of the things I like to play, but I'm open to learning a new tuning. |
|
|
|
Joe Elk
From:
Ohio, USA
|
Posted 5 Mar 2016 9:34 am
|
|
Please keep us abreast of your progress! Pictures are nice and digital film is cheap.
Joe Elk |
|
|
|
James Kerr
From:
Scotland, UK
|
Posted 5 Mar 2016 3:50 pm
|
|
David,
I saw your post and the one from Joe and thought I would chip in here, (pun there somewhere)With regard to the lack of tools, up here in Scotland all High Schools are Community Schools, meaning their facilities are there to be used by the public. The High School next to me, like all others, has a fully equipped Woodwork Dept. and run classes in the evening making musical Instruments, session costs are minimal, check it out.
Scale length, I use 23 inches, all the reasons for longer scales, up to 25 inches hold good for Pedal Guitars and Duesenberg (palm Pedals)which require no slant steels, slants are easier and more accurate on a shorter scale length, the reason why old timers all stay short and sustain is not a problem.
I use Mahogany too, a good hard stable wood. I mess around with many designs, the one in this video is a copy of the National Dynamic, this one has 7 strings, I have 6, 7 & 8 stringers.
https://www.youtube.com/watch?v=2KyLWRZVZV8
James. |
|
|
|
Tom Pettingill
From:
California, USA (deceased)
|
Posted 7 Mar 2016 6:22 am
|
|
Great looking hunk of mahogany David! I use mahogany on a lot of my builds and it makes for a great instrument.
| Quote: |
| the router is not a slow and easy beast to use and I've been happy to learn about its terrible powers on several practice chunks before getting into the actual guitar base! |
Routers can be very dangerous. Things can go very wrong very fast with 20,000 RPM's of razor sharp spinning metal. I'd advise not to try freehanding with one, they are just too hard to control for any high degree of accuracy. I'd highly recommend making and or buying templates and using a top bearing template bit for the final cuts. Something like one of these. The bearing rides on your template and creates a 1 to 1 cut.
.

_________________
Some misc pics of my hand crafted steels
Follow me on Facebook here |
|
|
|
David Feller
From:
United Kingdom
|
Posted 10 Mar 2016 8:36 am
|
|
Thanks for the helpful tips, Mr. Pettingill!. Indeed, the router is a wild thing. I think I benefit to some extent from my ignorance of the situation: I am happy to charge ahead where experience would create more caution, but I have taken heed of your tips on router use. I have a couple of the bearing bits and am looking at templates for things, especially the pickup and controls.
In the mean time, I have used the oscillating saw to take off those bits that don't look like the design drawing and gotten an overall outline save for the headstock, which I am still debating. I also routed a bit with reasonable margins to create some of the inlay area.
 |
|
|
|
David Feller
From:
United Kingdom
|
Posted 10 Apr 2016 11:53 pm
|
|
| I've moved along pretty well but am having trouble posting photos. Maybe later today the website will handle things and I can show the progress. |
|
|
|
Stefan Robertson
From:
Hertfordshire, UK
|
Posted 11 Apr 2016 12:18 am
|
|
David I live eat breathe Lap Steel Guitar and am super excited we have another builder on board here in the UK
I haven't built any myself but I play semi pro currently. Any advice with regards to playability I'm more than happy to help.
I'm based in London as is Joe who is more of a pedal player than Lap Steel Guitar. Where are you based?
_________________
Stefan
Bill Hatcher custom 12 string Lap Steel Guitar
E13#9/F secrets: https://thelapsteelguitarist.wordpress.com
"Give it up for The Lap Steel Guitarist" |
|
|
|
David Feller
From:
United Kingdom
|
Posted 11 Apr 2016 5:13 am
|
|
Great to hear from you Stefan! I'm afraid I'm doing it the other way: I'm building the guitar before I can really play much, but I think it's been a plus as I've really learned a lot about how the instrument makes sound and why. The £30 starter I bought on Ebay has really made me want to get into it but it sounds, uh, not good. Reading the vast amounts of information on the list regarding what makes a good lap steel just kept getting me more excited about it.
I'm in Sandy, so up the A1(m) toward's Bedford. Perhaps I should be coming to you for some lessons! |
|
|
|
David Feller
From:
United Kingdom
|
Posted 11 Apr 2016 5:19 am
|
|
So I probably should have posted this first. I got on a drawing board and made an outline of the guitar and used a downloadable pdf file for the fretboard. I then cut the picture up and moved the pieces around some on the wood until I got the profile that looked 'right' to me. I then used the router to cut the first level of the outline, and the oscillating saw to cut the rest of the way through. I left margins of about 1/4" with the router just to make sure it didn't go where I didn't want it.
 |
|
|
|
David Feller
From:
United Kingdom
|
Posted 11 Apr 2016 5:22 am
|
|
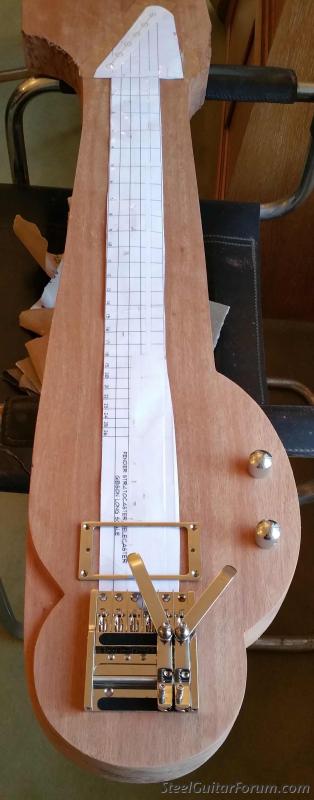
Once I had the outline sawed through the 2" thick board I started to sand the outline to get a clean line. In this shot I still haven't cut the headstock shape because, while I wanted to use inline tuners, I hadn't decided on the shape for the head. I also wasn't sold on the length of the fretboard and so sort of kept it open. In this shot I think I was thinking of going with a 23" fretboard.
 |
|
|
|
David Feller
From:
United Kingdom
|
Posted 11 Apr 2016 5:28 am
|
|
My original idea for the fretboard was to get a piece of clear plexiglass/acrylic and then print out a fretboard I could mount underneath it. That way I could play with some designs and even change the board in the future if I wanted to. Then I started looking at the price of a piece of acrylic and you know, hardrock maple board blanks on ebay were actually cheaper, so I got one of those. Then I had to decide how I was going to mount it.
 |
|
|
|
David Feller
From:
United Kingdom
|
Posted 11 Apr 2016 5:34 am
|
|
In order to keep string height up with the surface-mounted bridge I was planning, I decided to get the fretboard as flush as possible with the main board, and so routed a box for it to sit in. I was able to keep the clearance pretty snug, and the fretboard would be nice and contrasty with mahogany. This part took me a long time because I had to commit to a scale length. Hearing Tom Pettingill's advice in my head, I got intrigued by palm benders and the 25.5" scale. You can also see that I started to do some of the copper inlays on the body that I had imagined in the first design.
 |
|
|
|
David Feller
From:
United Kingdom
|
Posted 13 Apr 2016 2:29 am
|
|
God bless the internet! I downloaded a schematic of a Telecaster headstock and measured the tuner positions relative to the string spacing I planned for. I'm sure there's a highly technical way of doing this, but I just took a compass and a straightedge and it worked out alright. This seemed to be the easiest solution for the tuners; I dabbled with the idea of a headless system of some sort, but when I finally decided on including palm benders the standard tuners seemed best. These are Wilkenson EZ-Lok machine heads.
 |
|
|
|
David Feller
From:
United Kingdom
|
Posted 13 Apr 2016 2:41 am
|
|
So the bridge arrived from Germany! I realise the photos are a bit out of order but you get the idea. I'm going to use a John Birch Hyperflux 2 humbucker pickup, which I want to try as the design uses 12 poles instead of 6 and so creates a wide field.
 |
|
|
|
David Feller
From:
United Kingdom
|
Posted 13 Apr 2016 2:52 am
|
|
That scalloped recess on the left side of the body is intended to be decorated with a copper inlay. Here's the piece being shaped
 |
|
|
|
David Feller
From:
United Kingdom
|
Posted 13 Apr 2016 2:58 am
|
|
So one night my girlfriend the artist had a dream that the guitar was blue, as it worked well with the copper and chrome metal work. I have not worked with wood dye before but found a nice blue and so gave it a shot. This is about the third coat of blue dye, sanded between each coat. I found when I sanded the dye would give way to the wood, and each coat gave more colour, but still some areas of the wood resisted. I actually like the variable effects, and the way the wood grain comes through. You can also see the ongoing development of copper decoration in this shot. with the exception of the scallop piece, the inlay is all made from stripped electrical wiring (a meter of 3-wire cable for £1.35!). I cut channels with an x-acto knife for the line inlays, and small nail holes were filled with wire pieces and then filed down for the little 'stars' along the left side.
 |
|
|
|
Bill Hatcher
From:
Atlanta Ga. USA
|
Posted 13 Apr 2016 8:44 am
|
|
| i was liking it until the blue showed up...but...since there is a girl involved...blue is fine. |
|
|
|
David Feller
From:
United Kingdom
|
Posted 14 Apr 2016 2:36 am
|
|
Yeah, I'm with you. When she suggested it I was not sure about it, but then I did a couple of photoshop sort of things and it was possible. I think the more I worked with the natural colour, the more it looked just massive--it's 2" thick and with the 25.5 inch scale it's over 30 inches, and I had some concern about it just being a log, if you know what I mean. And I figured, WTH, if the dye doesn't work out I've lost a chunk of £20 mahogany . . .
As it turns out, the dye process has been very instructive. The wood absorbs it in different ways in different places, and with each sanding the natural wood grain came out well. I used the dye in a filler/sealer and it filled the grain in ways I didn't expect as well. That and the red of the mahogany and the blue dye have worked to create a sort of peacock-like effect with lots of variation and shades between green and blue.
As I am applying the varnish (urethane) it is getting interesting. If at some point I don't like the body, the pricy bits can go on another body, but this has been a great learning experience from all angles for me: wood work, metal work, the electronics, everything. |
|
|
|
Tom Pettingill
From:
California, USA (deceased)
|
|
|
|
David Feller
From:
United Kingdom
|
Posted 25 Apr 2016 2:30 am
|
|
So, routed out the back of the body to accommodate the tone and volume controls and other wiring.

The back is going to be covered with felt (obviously, I know) but I made a little aluminium cover for the electronic bits to make sure extra stuff stays out of there.
 |
|
|
|