| Author |
Topic: The Restoration of a Fender Stringmaster D8 |
Alan Brookes
From:
Brummy living in Southern California
|
 Posted 17 Aug 2007 10:43 am
 |
|
My friend and fellow Brummy (that's someone from Birmingham, England), Basil Henriques, bought a Fender Stringmaster from Lark-in-the-Morning in San Francisco recently. As this is local for me I picked it up and brought it back to Oakland, just across the San Francisco Bay.
I've been doing some work on this instrument, and sending Basil regular progress reports. Basil suggested that other members might be interested in learning from what I'm uncovering, and benefit from the information, so I should post regular progress on the Forum.
This will be a long post, because I'm also in the process of modifying a a Harlin 8-string Multi-Kord to take regular pedals and knee levers, and scratch building four lap steels. Maybe I'll run another thread on the Multi-Kord, but for now, to the Fender....
The case, which was not the original, but which fits well, was in really bad shape. It was split in several places, off its hinges, and the lining smelled like monkeys had been living in it. I threw the lining out, reglued all the joints, fitted new brassware, and now I am waiting until I can find some suitcase-type material to cover it with. I've searched all the hardware and fabric stores within miles with no luck. If anyone knows where I can get cover material please let me know. In the meantime, since this is not original Fender I'll not bother people with details of the case restoration, so back to the Stringmaster....
The Machine head was in poor shape. One of the pans has a tuner completely missing, while one of the "lollipop" tuners has been replaced by an unmatched tuner with a white knob. Someone has taken cutters to the pan, and cut a notch, The other pan is in pretty good shape.


Chromed hardware is worn, but there is no rust or chips.

The Fender logo looked like it was rusty..

..but on removing it I realised that it was pressed brass. The raised letters are plated, and there is none of the plating missing, only some scratching from some past polishing. What looked like rust was actually the brass showing through the flaking paint.
I applied paint stripper to it...

When it's completely cured I shall clean it with alcohol, paint it black, and remove the paint from the chromed letters and border.
The body had had some sort of letters or stickers on, which had pulled off the paint in many places.


The back of the guitar shows how bad the paintwork was. It looks like it was painted with a tar brush. Notice the dripped paint round the edges...


The original colour of this instrument was off-white. The blue had been added at some later date.

The serial number stamped on the control plate is 0189. If anyone has any information about this number please let me know. Likewise, if anyone recognises this instrument please let me know because we are very interested in learning what we can about its history...

Notice the two holes between the string retainer and the the control plate. They go right through the instrument. Basil suspects that at one time someone may have added two pedals. I can see no other reason why anyone would have drilled holes here.
Three of the legs are original, albeit without the rubber feet. The fourth seems to have been made out of plumber's pipe.


A quick general cleaning of the instrument showed that the hardware is in pretty good shape. No replating will be necessary. Indeed, if you replate worn parts it often highlights the wear !

I couldn't resist including this picture...

No, I'm not planning on adding Harlin pedals to it, but since both instruments are being worked on simultaneously I thought a pose like this would cause some mind boggling !
Removal of all the harware came next. Notice that the chrome diamonds are not just there for decoration, they cover up the bolts which connect the two necks. Whoever applied the blue paint forgot to mask the bolts.

Strangely, on the other side there seems to have been a rectangular plate at some stage. Very mysterious !

Examination of the removed harware shows how one of the machine plates has been cut. It also shows that the tuners are soldered or welded into place. I didn't realise that Fender did that. It certainly makes replacement a big job. I regard this machine fixture as completely wasted.

I was hoping to find some sort of identification beneath the pick-ups. This was all I found, and it's unreadable...

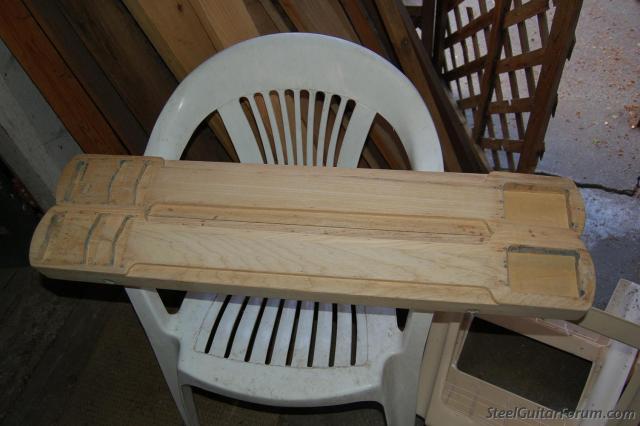
Now the instrument, stripped of fittings, is starting to look bare...


The Fender logo was painted over. One last look before stripping...

This is a good place to take a break. The instrument is in pieces...
Last edited by Alan Brookes on 17 Aug 2007 3:31 pm; edited 7 times in total |
|
|
|
Tom Pettingill
From:
California, USA (deceased)
|
|
|
|
Alan Brookes
From:
Brummy living in Southern California
|
Posted 17 Aug 2007 1:20 pm
|
|
So now we get to the fun part. A night covered in paint stripper, a few hours stripping off the paint, more application of paint stripper, a few hours later and we have....

But wait, look what's under the paint in the tuner wells...


A date pencilled in at the Fender factory... Oct. 29, 1953. At this stage it feels like being on an archaelogical dig. No-one has seen the bare wood since it left the factory.
I don't know the significance of the "#3".
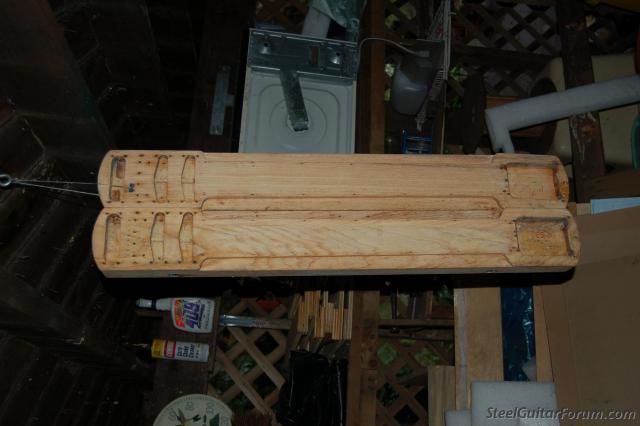
Once the wood was completely dry I washed it down with alcohol, to stop the stripper working. Then I filled the holes by the bridge, and sanded the body down.
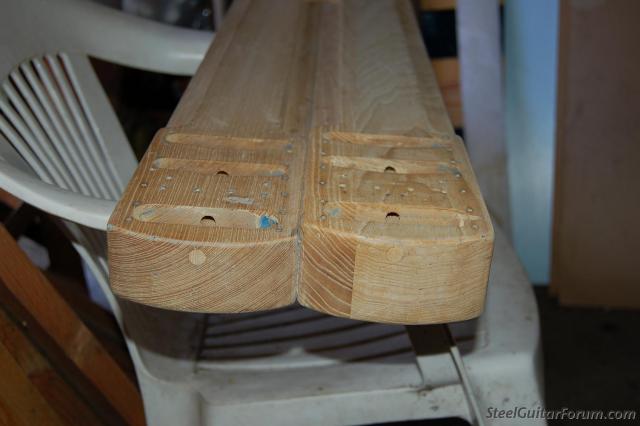
Looking at the end shows several facts...
[1] Fender didn't match their woods. That's probably why you don't see Stringmasters finished in natural wood. Fender knew they would be applying paint, so they made no attempt to match the wood.
[2] To make boring the tunnels for the wiring easy they bored straight through from one end, and then pegged up the hole.
With the fittings removed it was easier to clean them up. Now we're seeing progress...

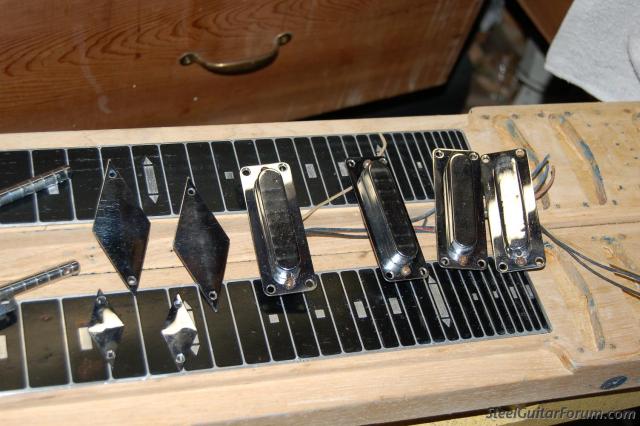
The fingerboards are of some concern. There was a lot of blue overspray on them. Removing that took many hours by hand. The fingerboards are made of pressed brass, with the frets standing high above the surface. The brass is then painted and the paint removed from the frets. Although I've cleaned and polished them as much as I can there are visible marks in the black areas. At this stage I can't see any alternative but the completely strip the fingerboards and respray black. I've tried touching up the black but it shows.

Another overnight wait, and then the next episode...
Last edited by Alan Brookes on 17 Aug 2007 3:34 pm; edited 3 times in total |
|
|
|
Alan Brookes
From:
Brummy living in Southern California
|
Posted 17 Aug 2007 1:36 pm
|
|
The body has been cleaned and sanded. Now on goes the undercoat...
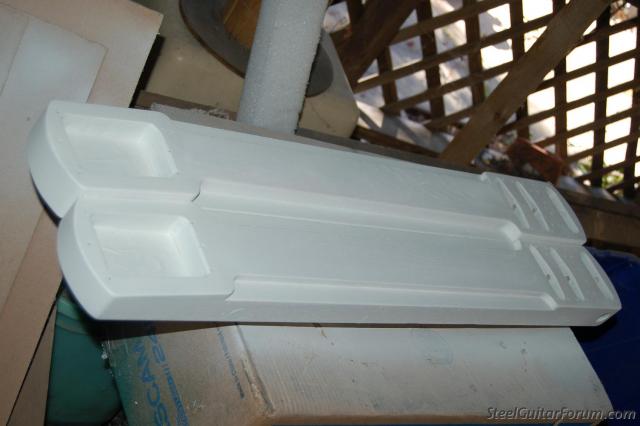

These two pictures were taken right after one another, one with flash and one without.
Three coats of white primer, between each coat a rubbing down with emery paper. The bare wood soaked up a lot of primer. I used three spray cans.
Several days later, the undercoat is well dry. Time to start applying the topcoat. I chose Almond. It's not a Fender standard colour, but I didn't want off-white as that would show off the dings from all those years.


Now it's starting to look like a Stringmaster again. Notice how I've masked off the bolts to prevent them from becoming bunged up with paint again. The paint stripper and a craft knife managed to remove all the old blue. You can't see in this photo but I also masked off the pencilled dates in the machine head well. I shall preserve these with clear varnish for future posterity. (Some of the hardware is just placed on, to give some idea of how it will eventually look.)
That's progress so far. Tomorrow I shall fill up some of the dings from rough handling over the years. (I avoided sanding down the body to the level of the dings, which would have created a wobbly-looking surface.) Then I shall hand sand the whole thing and apply more topcoat, then repeat the process until enough topcoat has accumulated that it will stand up to future wear. It's taken three cans of topcoat so far. I have another five cans, which should be enough with some to spare.
The good part of this stage is that the project has bottom out, and from hereon it's going back together again.
Last edited by Alan Brookes on 17 Aug 2007 1:54 pm; edited 1 time in total |
|
|
|
Alan Brookes
From:
Brummy living in Southern California
|
Posted 17 Aug 2007 1:49 pm
|
|
A solution has to be found to the machine head problem. There is only one good pan, and it has lollipop-type tuners. Over in England, Basil has a spare pan but they have the later tuners on...

He has another pan, but without tuners. So we need to find someone who has a pan with either the original lollipop tuners or the later ones, so that we have a matched pair.
Then there's the logo transfer...

I believe Bobbe Seymour stocks these. |
|
|
|
Doug Beaumier
From:
Northampton, MA
|
|
|
|
Bill Creller
From:
Saginaw, Michigan, USA (deceased)
|
Posted 17 Aug 2007 3:15 pm
|
|
Lookin' good there Alan.  I had thought that the Stringmasters had cast aluminum tuner pans, or is that on the latest ones?? The pans you have there are (from what I can see)are the same as the Dual-Pro pans, made of stamped steel. I had thought that the Stringmasters had cast aluminum tuner pans, or is that on the latest ones?? The pans you have there are (from what I can see)are the same as the Dual-Pro pans, made of stamped steel.
When I strip the body on those, I take the necks apart and strip all sides. I'm doing a D6 right now.
I have some leg shafts/tubes that need rechroming. No lock collars though. If you want or need one or all, let me know. The price is right too--just shipping
Regards BILL |
|
|
|
Alan Brookes
From:
Brummy living in Southern California
|
Posted 17 Aug 2007 3:26 pm
|
|
| Doug Beaumier wrote: |
| Looks good so far! This is an early stringmaster, about 1954? |
The pencilled note under the tuner pan says October 29, 1953, so it probably left the factory in 1954, as you estimate. |
|
|
|
Michael Johnstone
From:
Sylmar,Ca. USA
|
Posted 17 Aug 2007 3:41 pm
|
|
| You unbolted the necks and painted them seperately I trust. Also all those dings you mention can be filled,sanded,buffed out with steel wool and completely eliminated before applying primer so you can apply any color you wish with impunity. Bondo or regular Plastic Wood all work real well for the larger scars and layers of Superglue are ideal for the tiny dings. The T-8 I recently restored had huge ragged holes cut all the way thru the body and I actually inlaid blocks of new wood(swamp ash)into the excavations after squaring up the sides of the holes.After refinishing it's completely undectable.It's all about filling,sanding and preparation. |
|
|
|
Alan Brookes
From:
Brummy living in Southern California
|
Posted 17 Aug 2007 4:10 pm
|
|
| Michael Johnstone wrote: |
| ...It's all about filling,sanding and preparation. |
You're absolutely right. |
|
|
|
Doug Beaumier
From:
Northampton, MA
|
|
|
|
Charley Wilder
From:
Dover, New Hampshire, USA
|
Posted 17 Aug 2007 4:27 pm
|
|
| Alan, I'm enjoying this thread very much! As far as doing repairs or restorations goes, I have absolutely no talent what so ever. So to see something like this is great fun! |
|
|
|
basilh
From:
United Kingdom
|
Posted 17 Aug 2007 6:30 pm
|
|
| Quote: |
Then there's the logo transfer...
I believe Bobbe Seymour stocks these. |
No need Alan that picture is of one I already have.
What we need is either a "Lollypop Tuner" to repair the missing one OR another Stringmaster Mk2 Tuning pan tuner assembly to match the brand new one that you pictured above.
I'm not too bothered if the tuners don't match the year, this will be a "Player's" guitar not a museum piece!
The twin pickups DON'T have the later balance control, but they were wired in a "Humbucking" configuration.
BTW I Do have another couple of legs, so that's not a problem. We can give the plumber back his piece of piping !!
Great to see that progress... has anyone noticed the scale length of this 1953 guitar ? |
|
|
|
Doug Beaumier
From:
Northampton, MA
|
|
|
|
Alan Brookes
From:
Brummy living in Southern California
|
Posted 17 Aug 2007 7:59 pm
|
|
Yes, the scale length is 26".
By the way, I'm building a lap steel with a resonator which has a scale length of 29". |
|
|
|
Doug Beaumier
From:
Northampton, MA
|
|
|
|
Don Kona Woods
From:
Hawaiian Kama'aina
|
Posted 18 Aug 2007 12:14 am
|
|
Alan,
You are a master craftsman. 
Thanks for taking us on this educational journey.
I found it very interesting.
Looking forward to more pictures and reports.
Keep up the good work.
Aloha, 
Don |
|
|
|
HowardR
From:
N.Y.C.-Fire Island-Asheville
|
Posted 18 Aug 2007 5:59 am
|
|
| Alan F. Brookes wrote: |
Yes, the scale length is 26".
By the way, I'm building a lap steel with a resonator which has a scale length of 29". |
First of all......thank you very much for posting this as you are......this is an education.....and will be for future members......
Years ago on this forum, there was a wonderful player who had a 30" scale non pedal steel built for him by the late Freeman Cowgar of Cougar Steel guitars.....
This was Claude Brownell who played the 10 string Alkaire tuning.....that required no slants whatsoever....... |
|
|
|
Fred Bova
From:
Connecticut, USA
|
Posted 18 Aug 2007 8:54 am I have the Lollipop Tuners
|
|
I have just taken apart the Tuning Pans from my Dual Professional and removed the Lollipop Tuners. I am going to slot my Tuning Pans and replace my tuners with all new ones.
I will be selling my good Lollipop Tuners.
I have one Set of 8 Tuners (1-4) and (5-
I have another Set of (1-4)
And I have some spare parts.
The Lollipop Buttons were unsoldered from the shafts, but the tuner bodies are still soldered to the brass L plates.
After I clean and lube the Tuners they will be ready to be slipped into the holes of a Tuning Pan and the Lollipop Buttons reinstalled onto the shafts.
I will post pictures of the assemblies and parts after I clean and lube them.
Fred |
|
|
|
Rick Collins
From:
Claremont , CA USA
|
Posted 18 Aug 2007 9:34 am
|
|
Alan, I'm sure some will say it's a better investment and will sound better if it still has some of the original finish.
But to whom? Willie Nelson?  |
|
|
|
Drew Howard
From:
48854
|
Posted 18 Aug 2007 9:49 am
|
|
Alan,
Thanks so much for posting your restoration photos and commentary!! Basil will be getting a great axe.
Drew
_________________
http://www.drewhoward.com |
|
|
|
Alan Brookes
From:
Brummy living in Southern California
|
Posted 18 Aug 2007 11:06 am
|
|
| Michael Johnstone wrote: |
| You unbolted the necks and painted them seperately I trust... |
I would have liked to. 

I removed the bolts but the necks refused to come apart.  After several hours struggling with the problem I came to the conclusion that they had either become glued together over the years by the paint fusing, or someone had applied glue (!) After several hours struggling with the problem I came to the conclusion that they had either become glued together over the years by the paint fusing, or someone had applied glue (!)  Either way, I figured the only way to separate the necks was to drive wedges between them, and this would cause damage, and if someone really had glued them together the only way to separate the necks would be with a saw. Either way, I figured the only way to separate the necks was to drive wedges between them, and this would cause damage, and if someone really had glued them together the only way to separate the necks would be with a saw. 
If anyone wants to remove the bolts, this is how I did it. I used a wide screwdriver to unscrew the one side, then tapped it with a hammer, which unjammed the other side, then I pulled out the nut that was unscrewed from the shaft with pliers, making sure not to touch the wood. Then I inserted dowelling into the hole and tapped out the shaft with a hammer. The second bolt was more difficult. Both ends were solid and would not move, so I used a drill punch to tap the outside of the slots lightly until they moved. Once unlocked I was able to use a screwdriver as before. Obviously the folks at Fender have a special tool to fit the slots, and if I were doing this a lot I would build a tool specifically for that job.
With the two necks permanently joined I have to ensure that each time I apply wood stopper and sand down the paint finish that I make sure every bit of dust is cleaned out of the grooves.
Last edited by Alan Brookes on 18 Aug 2007 11:22 am; edited 1 time in total |
|
|
|
Alan Brookes
From:
Brummy living in Southern California
|
Posted 18 Aug 2007 11:14 am Re: I have the Lollipop Tuners
|
|
| Fred Bova wrote: |
I have just taken apart the Tuning Pans from my Dual Professional and removed the Lollipop Tuners. I am going to slot my Tuning Pans and replace my tuners with all new ones.
I will be selling my good Lollipop Tuners.
I have one Set of 8 Tuners (1-4) and (5-
I have another Set of (1-4)
And I have some spare parts.
The Lollipop Buttons were unsoldered from the shafts, but the tuner bodies are still soldered to the brass L plates.
After I clean and lube the Tuners they will be ready to be slipped into the holes of a Tuning Pan and the Lollipop Buttons reinstalled onto the shafts.
I will post pictures of the assemblies and parts after I clean and lube them.
Fred |
Fred, if you're going to slot your tuning pans to take new tuners then the pan that we have with one slot would work for you, as you would just have to put more slots in.
I think between us we can fill each other's requirements, so hold off selling the lollipop tuners for a while.
Would you please send me some images of what you have so that I can make sure we're on the same wavelength. |
|
|
|
Alan Brookes
From:
Brummy living in Southern California
|
Posted 18 Aug 2007 11:18 am
|
|
| HowardR wrote: |
| First of all......thank you very much for posting this as you are......this is an education.....and will be for future members.... |
Thanks Howard. I'm glad I started this thread. I feel like I have hundreds of partners out there working with me. Though I've been building lap steels and other instruments for 44 years I've never worked on a Stringmaster before, so this is an education for me, too. |
|
|
|
Alan Brookes
From:
Brummy living in Southern California
|
Posted 18 Aug 2007 11:26 am
|
|
| Rick Collins wrote: |
| ...it will sound better if it still has some of the original finish. But to whom? Willie Nelson? |
You don't realise how apt that is. I once wrote a song "Dad Can I Have a Guitar Just Like Willie's" and I recorded it last February with Basil backing me. Just for fun, of course; it will never be released !  |
|
|
|