| Author |
Topic: ShoBud Restoration Update + a Question (Body Cracks) |
William Liemandt
From:
New Mexico
|
 Posted 16 Nov 2015 12:21 pm
 |
|
Here are a few update pictures of a '72 ShoBud Professional I'm working. This was originally in the dark tobacco brown colour and now is a substantially lighter shade. Finished with nitrocellulose lacquer (photos are pre-polishing).
Interestingly, when I removed the two end plates the body halves just fell apart. Nothing was holding them together. ShoBud had used two 1/4" dowels, one each near the ends of the cabinet to fasten the body halves together, and the glue had dried out, shrunk, and was doing nothing. This guitar now has five glued dowels along the entire cabinet length, and the body seams are glued, and I believe this should be a somewhat more sturdy cabinet than it was originally.
Whilst I was in there, I removed that most butt-ugly finish ever, Zolatone or Moxatone, or whatever it is called, and refinished the underside in natural lacquered birds eye maple. I have a personal story about why I hate that original finish, just ask me sometime and I might tell it.

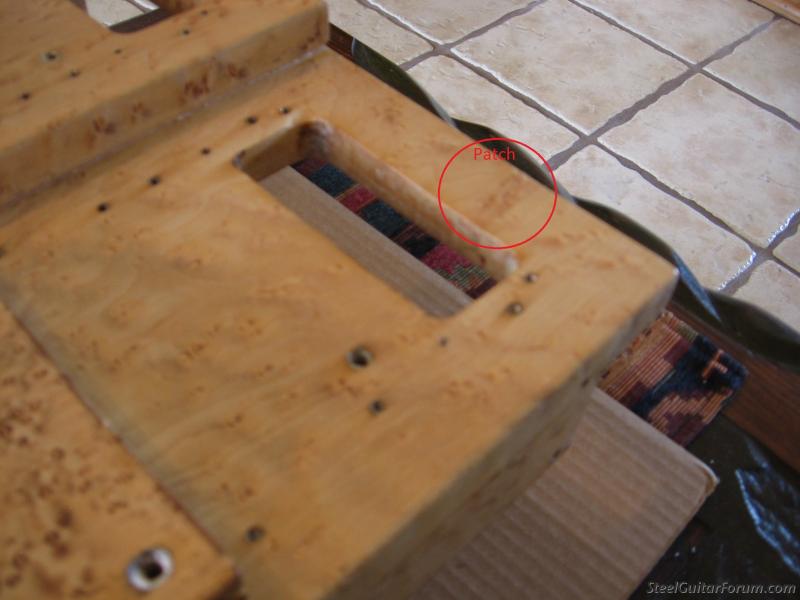
I had three cracks in the body, all near the changer ends where steel guitars are quite susceptible to cracking. One crack on the top side and quite visible, and two cracks on the bottom side, which are totally hidden by hardware. I routed 1/4" X 1/4" slots where the cracks were and inlaid birds eye maple patches there. Until I got in there, I was not aware that ShoBud had inserted hardwood splines in the changer end of the body to prevent cracks from penetrating top to bottom (the splines never cracked). My patches interlock with these splines in my attempt to lock the entire repair together. I hope this holds up.


These cracks occur where one inserts the wood screws that attach the wood cabinet to the metal end plates. Were the screw holes properly pre-drilled or not, I do not know. I am leaning towards installing some threaded inserts (10-32 internal threads and knife edged hardwood external threads) to prevent future cracking situations. I would then use a machine screw to attach the body to end plate. Has anyone ever seen or tried this approach before? Constructive comments on this idea, pro or con, would be appreciated.

Last edited by William Liemandt on 16 Nov 2015 6:50 pm; edited 2 times in total |
|
|
|
J R Rose
From:
Keota, Oklahoma, USA
|
Posted 16 Nov 2015 6:46 pm
|
|
Beautiful work William. That is a body to die for. Beautiful wood. I think I would use a tapered countersink bit to pre drill screw holes and forget about the insert. In the day this was made I do not think they had tapered bits to pre drill so the cracks in a lot of steels. Just my thoughts, J.R.
_________________
NOTHING..Sold it all. J.R. Rose |
|
|
|
Ron Pruter
From:
Arizona, USA
|
Posted 16 Nov 2015 8:15 pm
|
|
William, Be careful when tightening your front and back end plate to apron screws. If there is a gap due to extensive sanding, pulling the screw real tight will crack the apron to top deck joint near by. RP
_________________
Emmons SKH Le Grande, '73 Fender P/J bass, Tick tack bass, Regal high strung, USA Nashville 112. |
|
|
|
John Billings
From:
Ohio, USA
|
Posted 17 Nov 2015 10:09 am
|
|
I've always thought that a big part of the cracking issue was due to the fact that wood moves, for various reasons like shrinkage or changes in humidity. The aluminum changer mount move much less.
_________________
Dr. Z Surgical Steel amp, amazing!
"74 Bud S-10 3&6
'73 Bud S-10 3&5(under construction)
'63 Fingertip S-10, at James awaiting 6 knees
'57 Strat, LP Blue
'91 Tele with 60's Maple neck
Dozen more guitars!
Dozens of amps, but SF Quad reverb, Rick Johnson cabs. JBL 15, '64 Vibroverb for at home.
'52 and '56 Pro Amps |
|
|
|
William Liemandt
From:
New Mexico
|
Posted 18 Nov 2015 9:14 am
|
|
| Thanks J.R., Ron, and John. I appreciate the inputs. |
|
|
|